
by Sebastian Saemann | Jun 21, 2022 | Database, Tutorials
Back in 2010 a solution was created to solve the massive MySQL scalability challenges at YouTube – and then Vitess was born. Later in 2018, the project became part of the Cloud Native Computing Foundation and since 2019 it has been listed as one of the graduated projects. Now it is in good company with other prominent CNCF projects like Kubernetes, Prometheus and some more.
Vitess is an open source MySQL-compatible database clustering system for horizontal scaling – you could also say it is a sharding middleware for MySQL. It combines and extends many important SQL features with the scalability of a NoSQL database, and solves multiple challenges of operating ordinary MySQL setups. With Vitess, MySQL becomes massively scalable and highly available. Its nature is cloud native, but it can also be run on bare metal environments.
Architecture
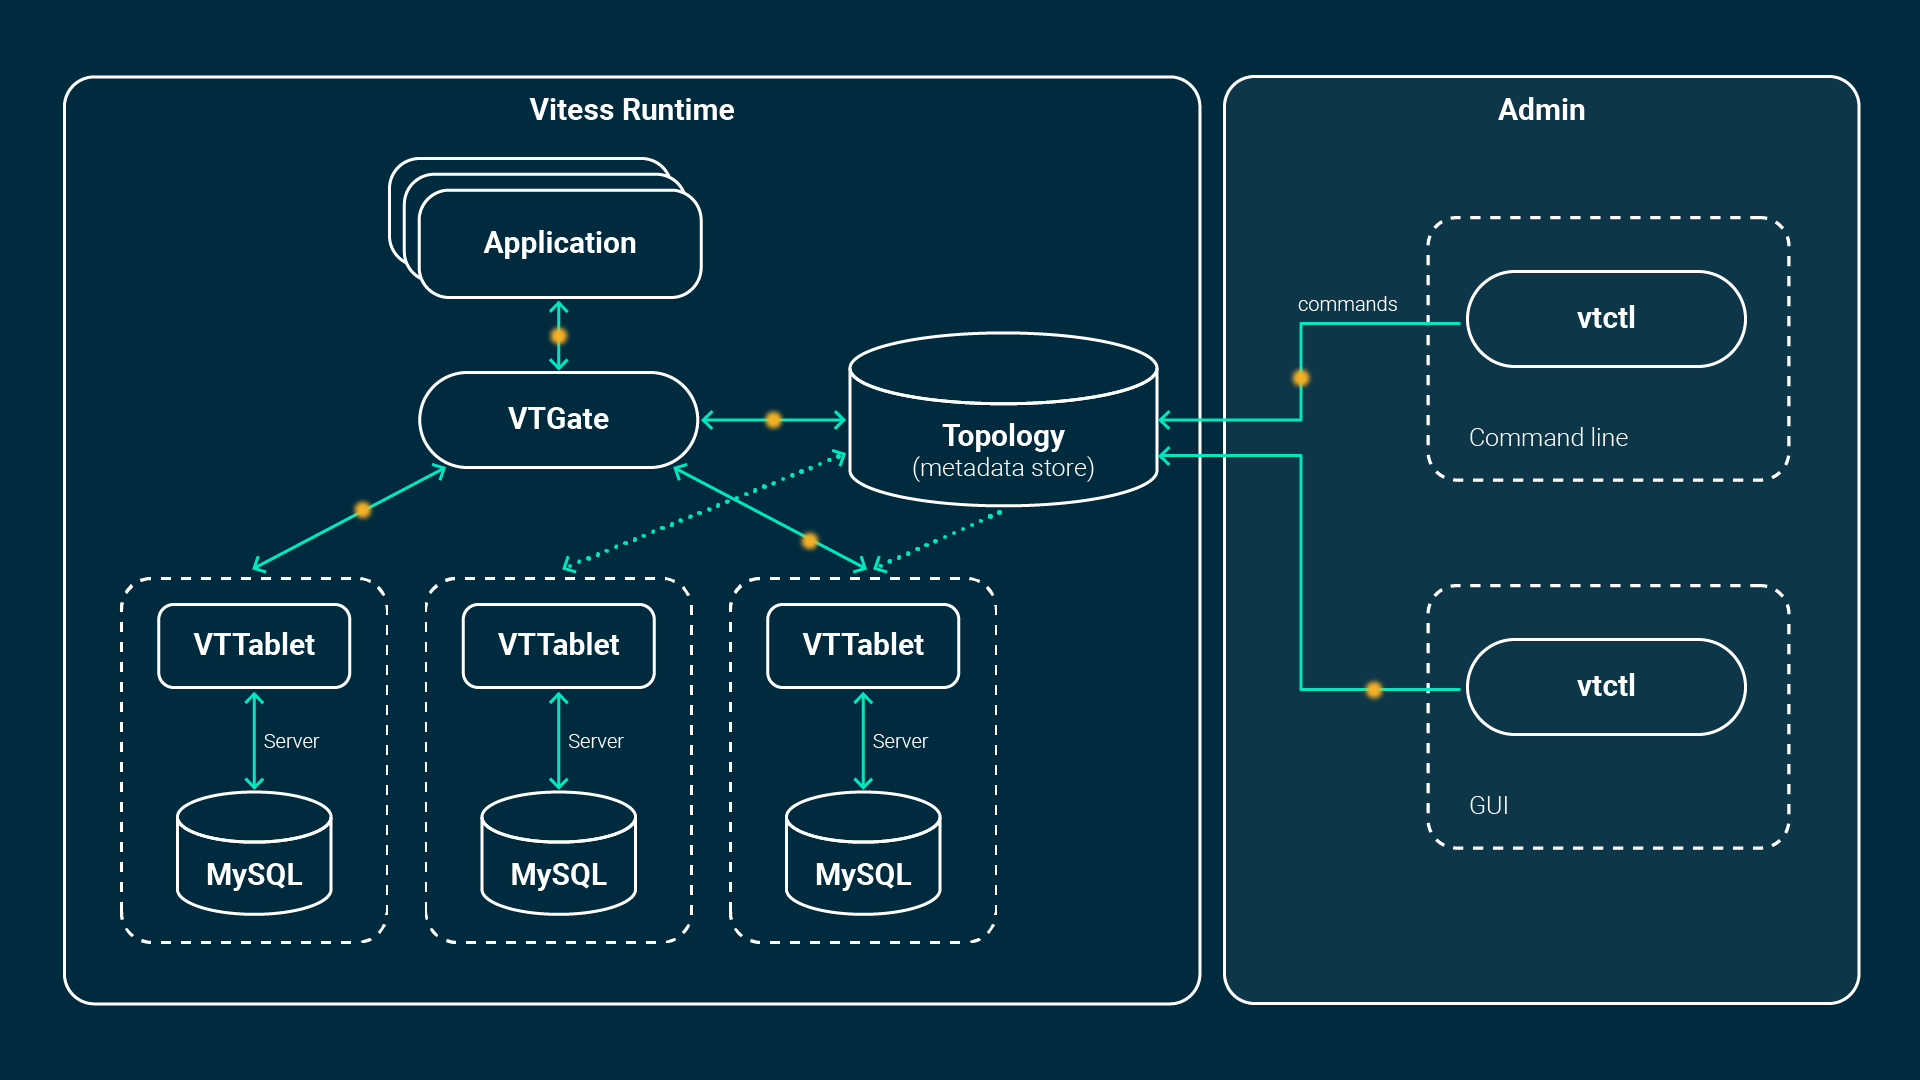
It consists of multiple additional components such as the VTGate, VTTablet, VTctld and a topology service backed by etcd or zookeeper. The application connects either by Vitess’ native database drivers or by using the MySQL protocol, which means any MySQL clients and libraries are compatible.
The application connects to the so called VTGate, a kind of lightweight proxy which knows the state of the MySQL instances (VTTablets) and where what kind of data is stored, in case of sharded databases. This information is stored within the Topology Service. The VTGate routes the queries accordingly to the belonging VTTablets.
A tablet, on the other hand, is the combination of a VTTablet process and the MySQL instance itself. It runs either in primary, replica or read-only mode, if healthy. There is a replication between one primary and multiple replicas per database. If a primary fails, a replica will be promoted and Vitess helps in the process of reparenting. This can all be fully automated. New, additional or failed replicas get instantiated from scratch. They will get the data of the latest backup available and hooked up to the replication. As soon as it catches up, it is part of the cluster and VTGate will forward queries to it. Here’s an image to visualize this whole process:
Scalability Philosophy
Vitess attempts to run small instances not greater than 250GB of data. If your database becomes bigger, it needs to be split into multiple instances. There are multiple good operational benefits of this approach. In case of failures of an instance, it can be recovered much faster with less data. The time to recover is decreased due to faster backup transfers. Also, the replication tends to be happier with less delay. Moving instances and placing them on different nodes for improved resource usage more easily is some plus, too.
Data durability is achieved due to replication. Outages and failures of specific failure domains are quite normal. In cloud native environments it is even more normal that nodes and pods are drained or newly created and you try to be as flexible as possible to such events. Vitess is designed for exactly this and fits perfectly with its fully automatic recovery and reparenting capabilities to a cloud native environment such as Kubernetes.
Further, Vitess is meant to be run across data centres, regions or availability zones. Each domain has its own VTGate and pool of Tablets. This concept is called “Cells” in Vitess. We at NETWAYS Web Services are distributing replicas evenly across our availability zones to survive a complete outage of one zone. It would also be possible to run replicas in geographic regions for better latency and better experience for customers abroad.
Additional Features
Besides its cloud native nature and possibilities of endless scalability, there are even more handy and clever features, such as:
- Connection pooling and Deduplication
Usually MySQL needs to allocate some (~256KB – 3MB) memory for each connection. This memory is for the connections only and not for accelerating queries. Vitess instead creates very lightweight connections leveraging Go’s concurrency support. Those frontend connections then are pooled on less connections to the MySQL-Instances, so that it’s possible to handle thousands of connections smoothly and efficiently. Additionally, it registers identical requests in-flight and holds them back, so that only one query will hit your database.
- Query and transaction protection
Have you ever had the need to kill long running queries, which took down your database? Vitess limits the number of concurrent transactions and sets proper timeouts to each. Queries that will take too long will be terminated. Also, poorly written queries without LIMITS will be rewritten and limited, before potentially hurting the system.
- Sharding
Its built-in sharding features enable the growth of the database in form of sharding – without the need of adding additional application logic.
- Performance Monitoring
Performance analysis tools let you monitor, diagnose, and analyze your database performance.
- VReplication and workflows
VReplication is a key mechanism of Vitess. With VReplication, Events of the binlog are streamed from the sender to a receiver. Workflows are – as the name would suggest – flows to complete certain tasks. For instance, it can move a running production table to different database instance with close to no downtime (“MoveTable“). Also streaming a subset of data into another instance can be done by this concept. A “materialized view” comes in handy, if you have to join data, but the tables are sharded on different instances.
Conclusion
Vitess is a very powerful and clever piece of software! To be precise, it is a software used by hyperscalers brought to the masses and now available for everyone. If you want to know more, we will post more tutorials, which will cover more advanced topics, soon on regular basis. The documentation of vitess.io is also a good source to find out more. If you want to try it yourself there are multiple ways of doing so – the most convenient way is to use our Managed Database product and trust on our experience.

by Sebastian Saemann | Jul 8, 2020 | Kubernetes, Tutorials
As of this week, our customers can use the “node group feature” for their NWS Managed Kubernetes Cluster plan. What are node groups and what can I do with them? Our seventh blog post in the series explains this and more.
What are Node Groups?
With node groups, it is possible to create several Kubernetes node groups and manage them independently of each other. A node group describes a number of virtual machines that have various attributes as a group. Essentially, it determines which flavour – i.e. which VM-Model – is to be used within this group. However, other attributes can also be selected. Each node group can be scaled vertically at any time independently of the others.
Why Node Groups?
Node groups are suitable for executing pods on specific nodes. For example, it is possible to define a group with the “availability zone” attribute. In addition to the already existing “default-nodegroup”, which distributes the nodes relatively arbitrarily across all availability zones. Further node groups can be created, each of which is explicitly started in only one availability zone. Within the Kubernetes cluster, you can divide your pods into the corresponding availability zones or node groups.
Show existing Node Groups

The first image shows our exemplary Kubernetes cluster “k8s-ses”. This currently has two nodegroups: “default-master” and “default-worker”.
Create a Node Group
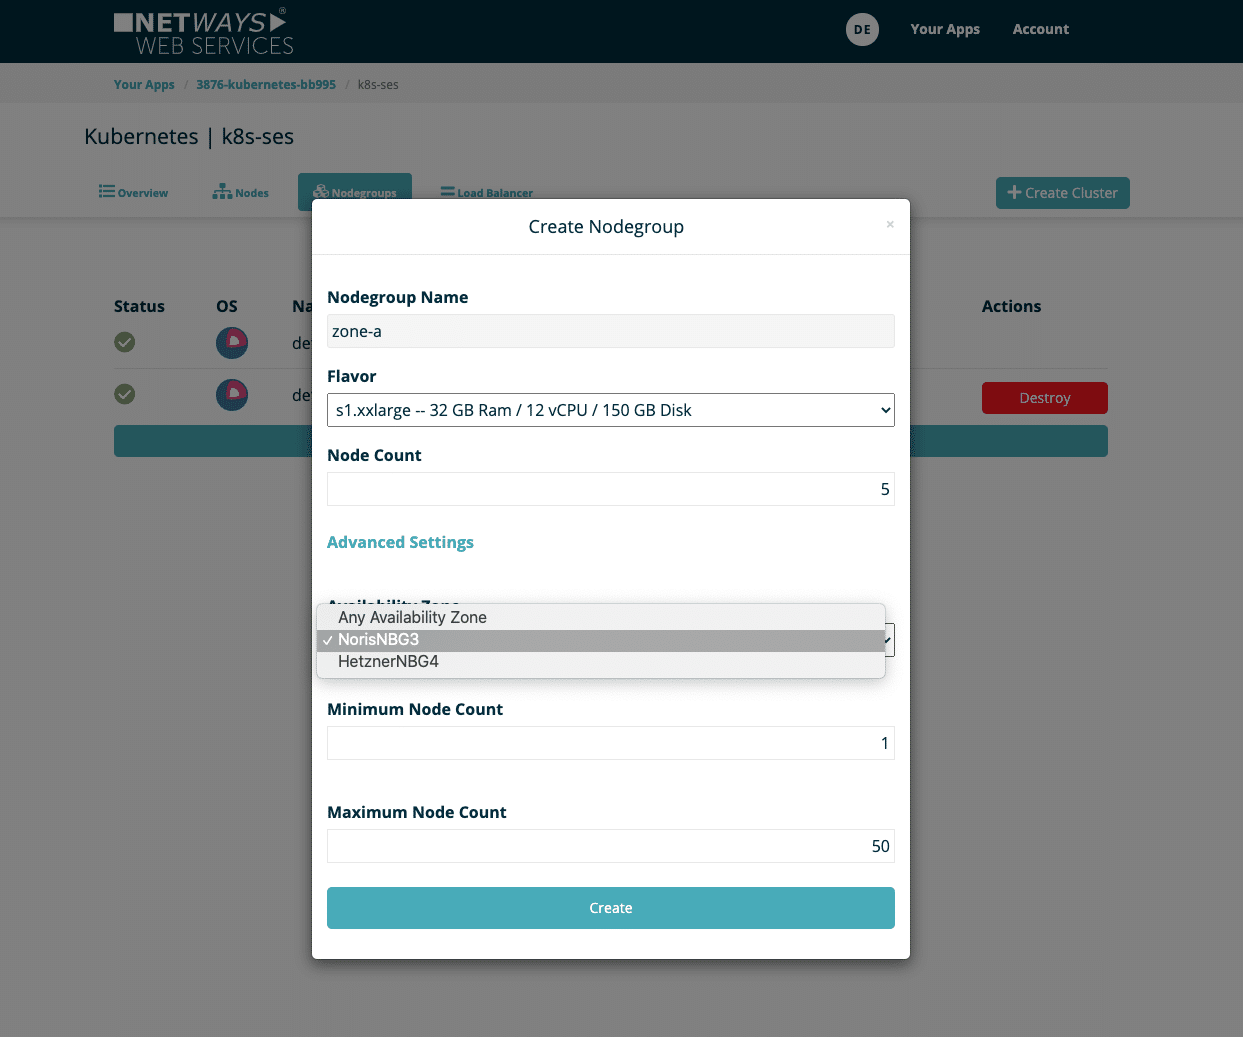
A new nodegroup can be created via the ‘Create Nodegroup’ dialogue with the following options:
- Name: Name of the nodegroup, which can later be used as a label for K8s
- Flavor: Size of the virtual machines used
- Node Count: Number of initial nodes, can be increased and decreased later at any time
- Availability Zone: A specific availability zone
- Minimum Node Count: The node group must not contain fewer nodes than the defined value
- Maximium Node Count: The node group cannot grow to more than the specified number of nodes
The last two options are particularly decisive for AutoScaling and therefore limit the automatic mechanism.
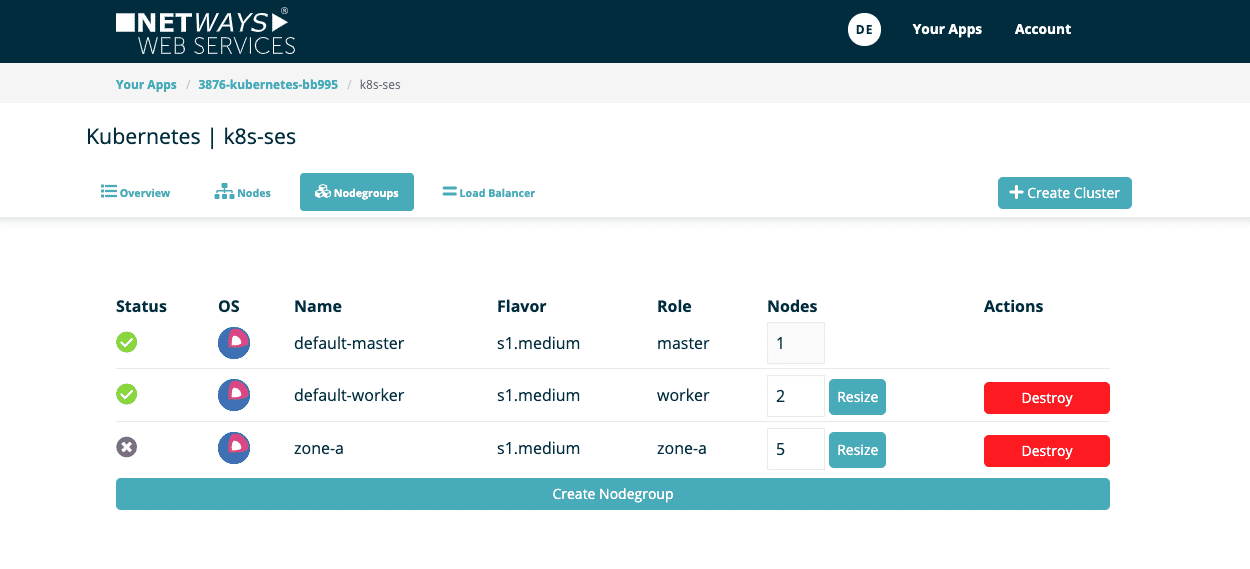
You will then see the new node group in the overview. Provisioning the nodes takes only a few minutes. The number of each group can also be individually changed or removed at any time.
Using Node Groups in the Kubernetes Cluster
Within the Kubernetes cluster, you can see your new nodes after they have been provisioned and are ready for use.
kubectl get nodes -L magnum.openstack.org/role
NAME                                 STATUS   ROLES    AGE   VERSION   ROLE
k8s-ses-6osreqalftvz-master-0        Ready    master   23h   v1.18.2   master
k8s-ses-6osreqalftvz-node-0          Ready    <none>   23h   v1.18.2   worker
k8s-ses-6osreqalftvz-node-1          Ready    <none>   23h   v1.18.2   worker
k8s-ses-zone-a-vrzkdalqjcud-node-0   Ready    <none>   31s   v1.18.2   zone-a
k8s-ses-zone-a-vrzkdalqjcud-node-1   Ready    <none>   31s   v1.18.2   zone-a
k8s-ses-zone-a-vrzkdalqjcud-node-2   Ready    <none>   31s   v1.18.2   zone-a
k8s-ses-zone-a-vrzkdalqjcud-node-3   Ready    <none>   31s   v1.18.2   zone-a
k8s-ses-zone-a-vrzkdalqjcud-node-4   Ready    <none>   31s   v1.18.2   zone-a
The node labels magnum.openstack.org/nodegroup and magnum.openstack.org/role bear the name of the node group for nodes that belong to the group. There is also the label topology.kubernetes.io/zone, which carries the name of the Availability Zone.
Deployments or pods can be assigned to nodes or groups with the help of the nodeSelectors:
nodeSelector:
  magnum.openstack.org/role: zone-a
Would you like to see for yourself how easy a Managed Kubernetes plan is at NWS? Then try it out right now at: https://nws.netways.de/de/kubernetes/
by Sebastian Saemann | May 27, 2020 | Kubernetes, Tutorials
Monitoring – for many a certain love-hate relationship. Some like it, others despise it. I am one of those who tend to despise it, but then grumble when you can’t see certain metrics and information. Regardless of personal preferences on the subject, however, the consensus of everyone is certain: monitoring is important and a setup is only as good as the monitoring that goes with it.
Anyone who wants to develop and operate their applications on the basis of Kubernetes will inevitably ask themselves sooner or later how they can monitor these applications and the Kubernetes cluster. One variant is the use of the monitoring solution Prometheus; more precisely, by using the Kubernetes Prometheus Operator. An exemplary and functional solution is shown in this blog post.
Kubernetes Operator
Kubernetes operators are, in short, extensions that can be used to create your own resource types. In addition to the standard Kubernetes resources such as Pods, DaemonSets, Services, etc., you can also use your own resources with the help of an operator. In our example, the following are new: Prometheus, ServiceMonitor and others. Operators are of great use when you need to perform special manual tasks for your application in order to run it properly. This could be, for example, database schema updates during version updates, special backup jobs or controlling events in distributed systems. As a rule, operators – like ordinary applications – run as containers within the cluster.
How does it work?
The basic idea is that the Prometheus Operator is used to start one or many Prometheus instances, which in turn are dynamically configured by the ServiceMonitor. This means that an ordinary Kubernetes service can be docked with a ServiceMonitor, which in turn can also read out the endpoints and configure the associated Prometheus instance accordingly. If the service or the endpoints change, for example in number or the endpoints have new IPs, the ServiceMonitor recognises this and reconfigures the Prometheus instance each time. In addition, a manual configuration can also be carried out via configmaps.
Requirements
The prerequisite is a functioning Kubernetes cluster. For the following example, I use an NWS Managed Kubernetes Cluster in version 1.16.2.
Installation of Prometheus Operator
First, the Prometheus operator is provided. A deployment, a required ClusterRole with associated ClusterRoleBinding and a ServiceAccount are defined.
apiVersion: rbac.authorization.k8s.io/v1
kind: ClusterRoleBinding
metadata:
  labels:
    app.kubernetes.io/component: controller
    app.kubernetes.io/name: prometheus-operator
    app.kubernetes.io/version: v0.38.0
  name: prometheus-operator
roleRef:
  apiGroup: rbac.authorization.k8s.io
  kind: ClusterRole
  name: prometheus-operator
subjects:
- kind: ServiceAccount
  name: prometheus-operator
  namespace: default
---
apiVersion: rbac.authorization.k8s.io/v1
kind: ClusterRole
metadata:
  labels:
    app.kubernetes.io/component: controller
    app.kubernetes.io/name: prometheus-operator
    app.kubernetes.io/version: v0.38.0
  name: prometheus-operator
rules:
- apiGroups:
  - apiextensions.k8s.io
  resources:
  - customresourcedefinitions
  verbs:
  - create
- apiGroups:
  - apiextensions.k8s.io
  resourceNames:
  - alertmanagers.monitoring.coreos.com
  - podmonitors.monitoring.coreos.com
  - prometheuses.monitoring.coreos.com
  - prometheusrules.monitoring.coreos.com
  - servicemonitors.monitoring.coreos.com
  - thanosrulers.monitoring.coreos.com
  resources:
  - customresourcedefinitions
  verbs:
  - get
  - update
- apiGroups:
  - monitoring.coreos.com
  resources:
  - alertmanagers
  - alertmanagers/finalizers
  - prometheuses
  - prometheuses/finalizers
  - thanosrulers
  - thanosrulers/finalizers
  - servicemonitors
  - podmonitors
  - prometheusrules
  verbs:
  - '*'
- apiGroups:
  - apps
  resources:
  - statefulsets
  verbs:
  - '*'
- apiGroups:
  - ""
  resources:
  - configmaps
  - secrets
  verbs:
  - '*'
- apiGroups:
  - ""
  resources:
  - pods
  verbs:
  - list
  - delete
- apiGroups:
  - ""
  resources:
  - services
  - services/finalizers
  - endpoints
  verbs:
  - get
  - create
  - update
  - delete
- apiGroups:
  - ""
  resources:
  - nodes
  verbs:
  - list
  - watch
- apiGroups:
  - ""
  resources:
  - namespaces
  verbs:
  - get
  - list
  - watch
---
apiVersion: apps/v1
kind: Deployment
metadata:
  labels:
    app.kubernetes.io/component: controller
    app.kubernetes.io/name: prometheus-operator
    app.kubernetes.io/version: v0.38.0
  name: prometheus-operator
  namespace: default
spec:
  replicas: 1
  selector:
    matchLabels:
      app.kubernetes.io/component: controller
      app.kubernetes.io/name: prometheus-operator
  template:
    metadata:
      labels:
        app.kubernetes.io/component: controller
        app.kubernetes.io/name: prometheus-operator
        app.kubernetes.io/version: v0.38.0
    spec:
      containers:
      - args:
        - --kubelet-service=kube-system/kubelet
        - --logtostderr=true
        - --config-reloader-image=jimmidyson/configmap-reload:v0.3.0
        - --prometheus-config-reloader=quay.io/coreos/prometheus-config-reloader:v0.38.0
        image: quay.io/coreos/prometheus-operator:v0.38.0
        name: prometheus-operator
        ports:
        - containerPort: 8080
          name: http
        resources:
          limits:
            cpu: 200m
            memory: 200Mi
          requests:
            cpu: 100m
            memory: 100Mi
        securityContext:
          allowPrivilegeEscalation: false
      nodeSelector:
        beta.kubernetes.io/os: linux
      securityContext:
        runAsNonRoot: true
        runAsUser: 65534
      serviceAccountName: prometheus-operator
---
apiVersion: v1
kind: ServiceAccount
metadata:
  labels:
    app.kubernetes.io/component: controller
    app.kubernetes.io/name: prometheus-operator
    app.kubernetes.io/version: v0.38.0
  name: prometheus-operator
  namespace: default
---
apiVersion: v1
kind: Service
metadata:
  labels:
    app.kubernetes.io/component: controller
    app.kubernetes.io/name: prometheus-operator
    app.kubernetes.io/version: v0.38.0
  name: prometheus-operator
  namespace: default
spec:
  clusterIP: None
  ports:
  - name: http
    port: 8080
    targetPort: http
  selector:
    app.kubernetes.io/component: controller
    app.kubernetes.io/name: prometheus-operator
kubectl apply -f 00-prometheus-operator.yaml
clusterrolebinding.rbac.authorization.k8s.io/prometheus-operator created
clusterrole.rbac.authorization.k8s.io/prometheus-operator created
deployment.apps/prometheus-operator created
serviceaccount/prometheus-operator created
service/prometheus-operator created
Role Based Access Control
In addition, corresponding Role Based Access Control (RBAC) policies are required. The Prometheus instances (StatefulSets), started by the Prometheus operator, start containers under the service account of the same name “Prometheus”. This account needs read access to the Kubernetes API in order to be able to read out the information about services and endpoints later.
Clusterrole
apiVersion: rbac.authorization.k8s.io/v1beta1
kind: ClusterRole
metadata:
  name: prometheus
rules:
- apiGroups: [""]
  resources:
  - nodes
  - services
  - endpoints
  - pods
  verbs: ["get", "list", "watch"]
- apiGroups: [""]
  resources:
  - configmaps
  verbs: ["get"]
- nonResourceURLs: ["/metrics"]
  verbs: ["get"]
kubectl apply -f 01-clusterrole.yaml
clusterrole.rbac.authorization.k8s.io/prometheus created
ClusterRoleBinding
apiVersion: rbac.authorization.k8s.io/v1beta1
kind: ClusterRoleBinding
metadata:
  name: prometheus
roleRef:
  apiGroup: rbac.authorization.k8s.io
  kind: ClusterRole
  name: prometheus
subjects:
- kind: ServiceAccount
  name: prometheus
  namespace: default
kubectl apply -f 01-clusterrolebinding.yaml
clusterrolebinding.rbac.authorization.k8s.io/prometheus created
ServiceAccount
apiVersion: v1
kind: ServiceAccount
metadata:
  name: prometheus
kubectl apply -f 01-serviceaccount.yaml
serviceaccount/prometheus created
Monitoring Kubernetes Cluster Nodes
There are various metrics that can be read from a Kubernetes cluster. In this example, we will initially only look at the system values of the Kubernetes nodes. The “Node Exporter” software, also provided by the Prometheus project, can be used to monitor the Kubernetes cluster nodes. This reads out all metrics about CPU, memory and I/O and makes these values available for retrieval under /metrics. Prometheus itself later “crawls” these metrics at regular intervals. A DaemonSet controls that one container/pod at a time is started on a Kubernetes node. With the help of the service, all endpoints are combined under one cluster IP.
apiVersion: apps/v1
kind: DaemonSet
metadata:
  name: node-exporter
spec:
  selector:
    matchLabels:
      app: node-exporter
  template:
    metadata:
      labels:
        app: node-exporter
      name: node-exporter
    spec:
      hostNetwork: true
      hostPID: true
      containers:
      - image: quay.io/prometheus/node-exporter:v0.18.1
        name: node-exporter
        ports:
        - containerPort: 9100
          hostPort: 9100
          name: scrape
        resources:
          requests:
            memory: 30Mi
            cpu: 100m
          limits:
            memory: 50Mi
            cpu: 200m
        volumeMounts:
        - name: proc
          readOnly:  true
          mountPath: /host/proc
        - name: sys
          readOnly: true
          mountPath: /host/sys
      volumes:
      - name: proc
        hostPath:
          path: /proc
      - name: sys
        hostPath:
          path: /sys
---
apiVersion: v1
kind: Service
metadata:
  labels:
    app: node-exporter
  annotations:
    prometheus.io/scrape: 'true'
  name: node-exporter
spec:
  ports:
  - name: metrics
    port: 9100
    protocol: TCP
  selector:
    app: node-exporter
kubectl apply -f 02-exporters.yaml
daemonset.apps/node-exporter created
service/node-exporter created
Service Monitor
With the so-called third party resource “ServiceMonitor”, provided by the Prometheus operator, it is possible to include the previously started service, in our case node-exporter, for future monitoring. The TPR itself receives a label team: frontend, which in turn is later used as a selector for the Prometheus instance.
apiVersion: monitoring.coreos.com/v1
kind: ServiceMonitor
metadata:
  name: node-exporter
  labels:
    team: frontend
spec:
  selector:
    matchLabels:
      app: node-exporter
  endpoints:
  - port: metrics
kubectl apply -f 03-service-monitor-node-exporter.yaml
servicemonitor.monitoring.coreos.com/node-exporter created
Prometheus Instance
A Prometheus instance is defined, which now collects all services based on the labels and obtains the metrics from their endpoints.
apiVersion: monitoring.coreos.com/v1
kind: Prometheus
metadata:
  name: prometheus
spec:
  serviceAccountName: prometheus
  serviceMonitorSelector:
    matchLabels:
      team: frontend
  resources:
    requests:
      memory: 400Mi
  enableAdminAPI: false
kubectl apply -f 04-prometheus-service-monitor-selector.yaml
prometheus.monitoring.coreos.com/prometheus created
Prometheus Service
The started Prometheus instance is exposed with a service object. After a short waiting time, a cloud load balancer is started that can be reached from the internet and passes through requests to our Prometheus instance.
apiVersion: v1
kind: Service
metadata:
  name: prometheus
spec:
  type: LoadBalancer
  ports:
  - name: web
    port: 9090
    protocol: TCP
    targetPort: web
  selector:
    prometheus: prometheus
kubectl apply -f 05-prometheus-service.yaml
service/prometheus created


kubectl get services
NAME         TYPE           CLUSTER-IP       EXTERNAL-IP   PORT(S)          AGE
prometheus   LoadBalancer   10.254.146.112    pending      9090:30214/TCP   58s
As soon as the external IP address is available, it can be accessed via http://x.x.x.x:9090/targets and you can see all your Kubernetes nodes, whose metrics will be retrieved regularly from now on. If additional nodes are added later, they are automatically included or removed again.

Visualisation with Grafana
The collected metrics can be easily and nicely visualised with Grafana. Grafana is an analysis tool that supports various data backends.
apiVersion: v1
kind: Service
metadata:
  name: grafana
spec:
#  type: LoadBalancer
  ports:
  - port: 3000
    targetPort: 3000
  selector:
    app: grafana
---
apiVersion: apps/v1
kind: Deployment
metadata:
  labels:
    app: grafana
  name: grafana
spec:
  selector:
    matchLabels:
      app: grafana
  replicas: 1
  revisionHistoryLimit: 2
  template:
    metadata:
      labels:
        app: grafana
    spec:
      containers:
      - image: grafana/grafana:latest
        name: grafana
        imagePullPolicy: Always
        ports:
        - containerPort: 3000
        env:
          - name: GF_AUTH_BASIC_ENABLED
            value: "false"
          - name: GF_AUTH_ANONYMOUS_ENABLED
            value: "true"
          - name: GF_AUTH_ANONYMOUS_ORG_ROLE
            value: Admin
          - name: GF_SERVER_ROOT_URL
            value: /api/v1/namespaces/default/services/grafana/proxy/
kubectl apply -f grafana.yaml
service/grafana created
deployment.apps/grafana created


kubectl proxy
Starting to serve on 127.0.0.1:8001
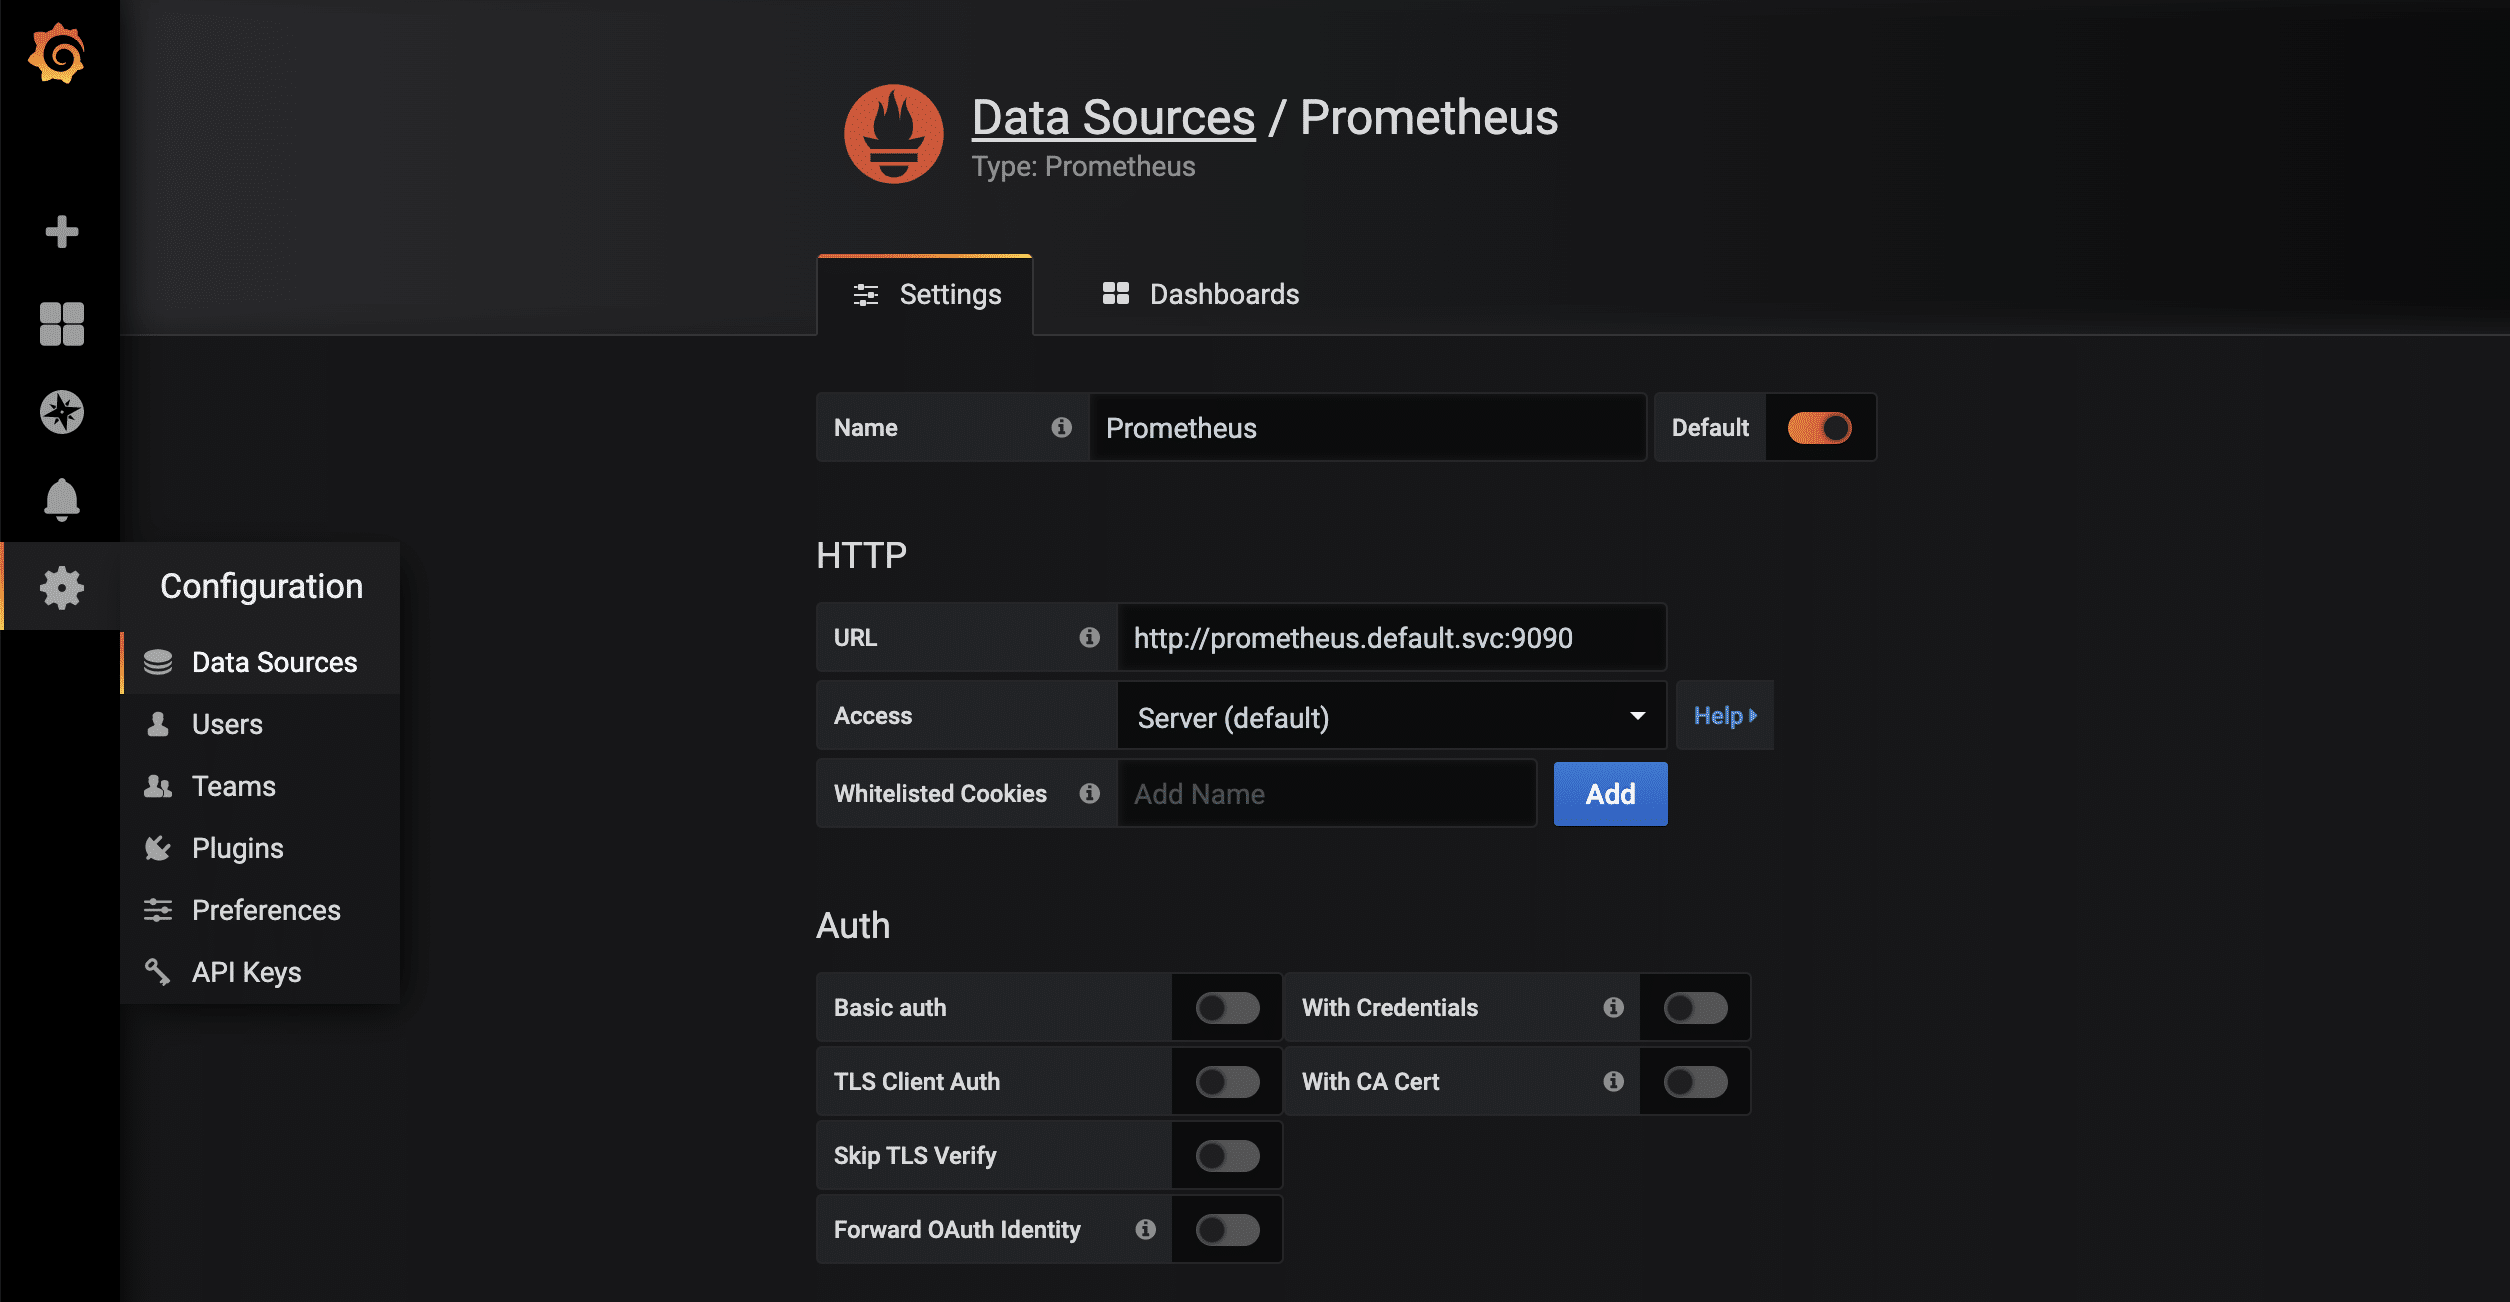
As soon as the proxy connection is available through kubectl, the started Grafana instance can be called up via http://localhost:8001/api/v1/namespaces/default/services/grafana/proxy/ in the browser. Only a few more steps are necessary so that the metrics available in Prometheus can now also be displayed in a visually appealing way. First, a new data source of the type Prometheus is created. Thanks to kubernetes’ own and internal DNS, the URL is http://prometheus.default.svc:9090. The schema is servicename.namespace.svc. Alternatively, of course, the cluster IP can also be used.
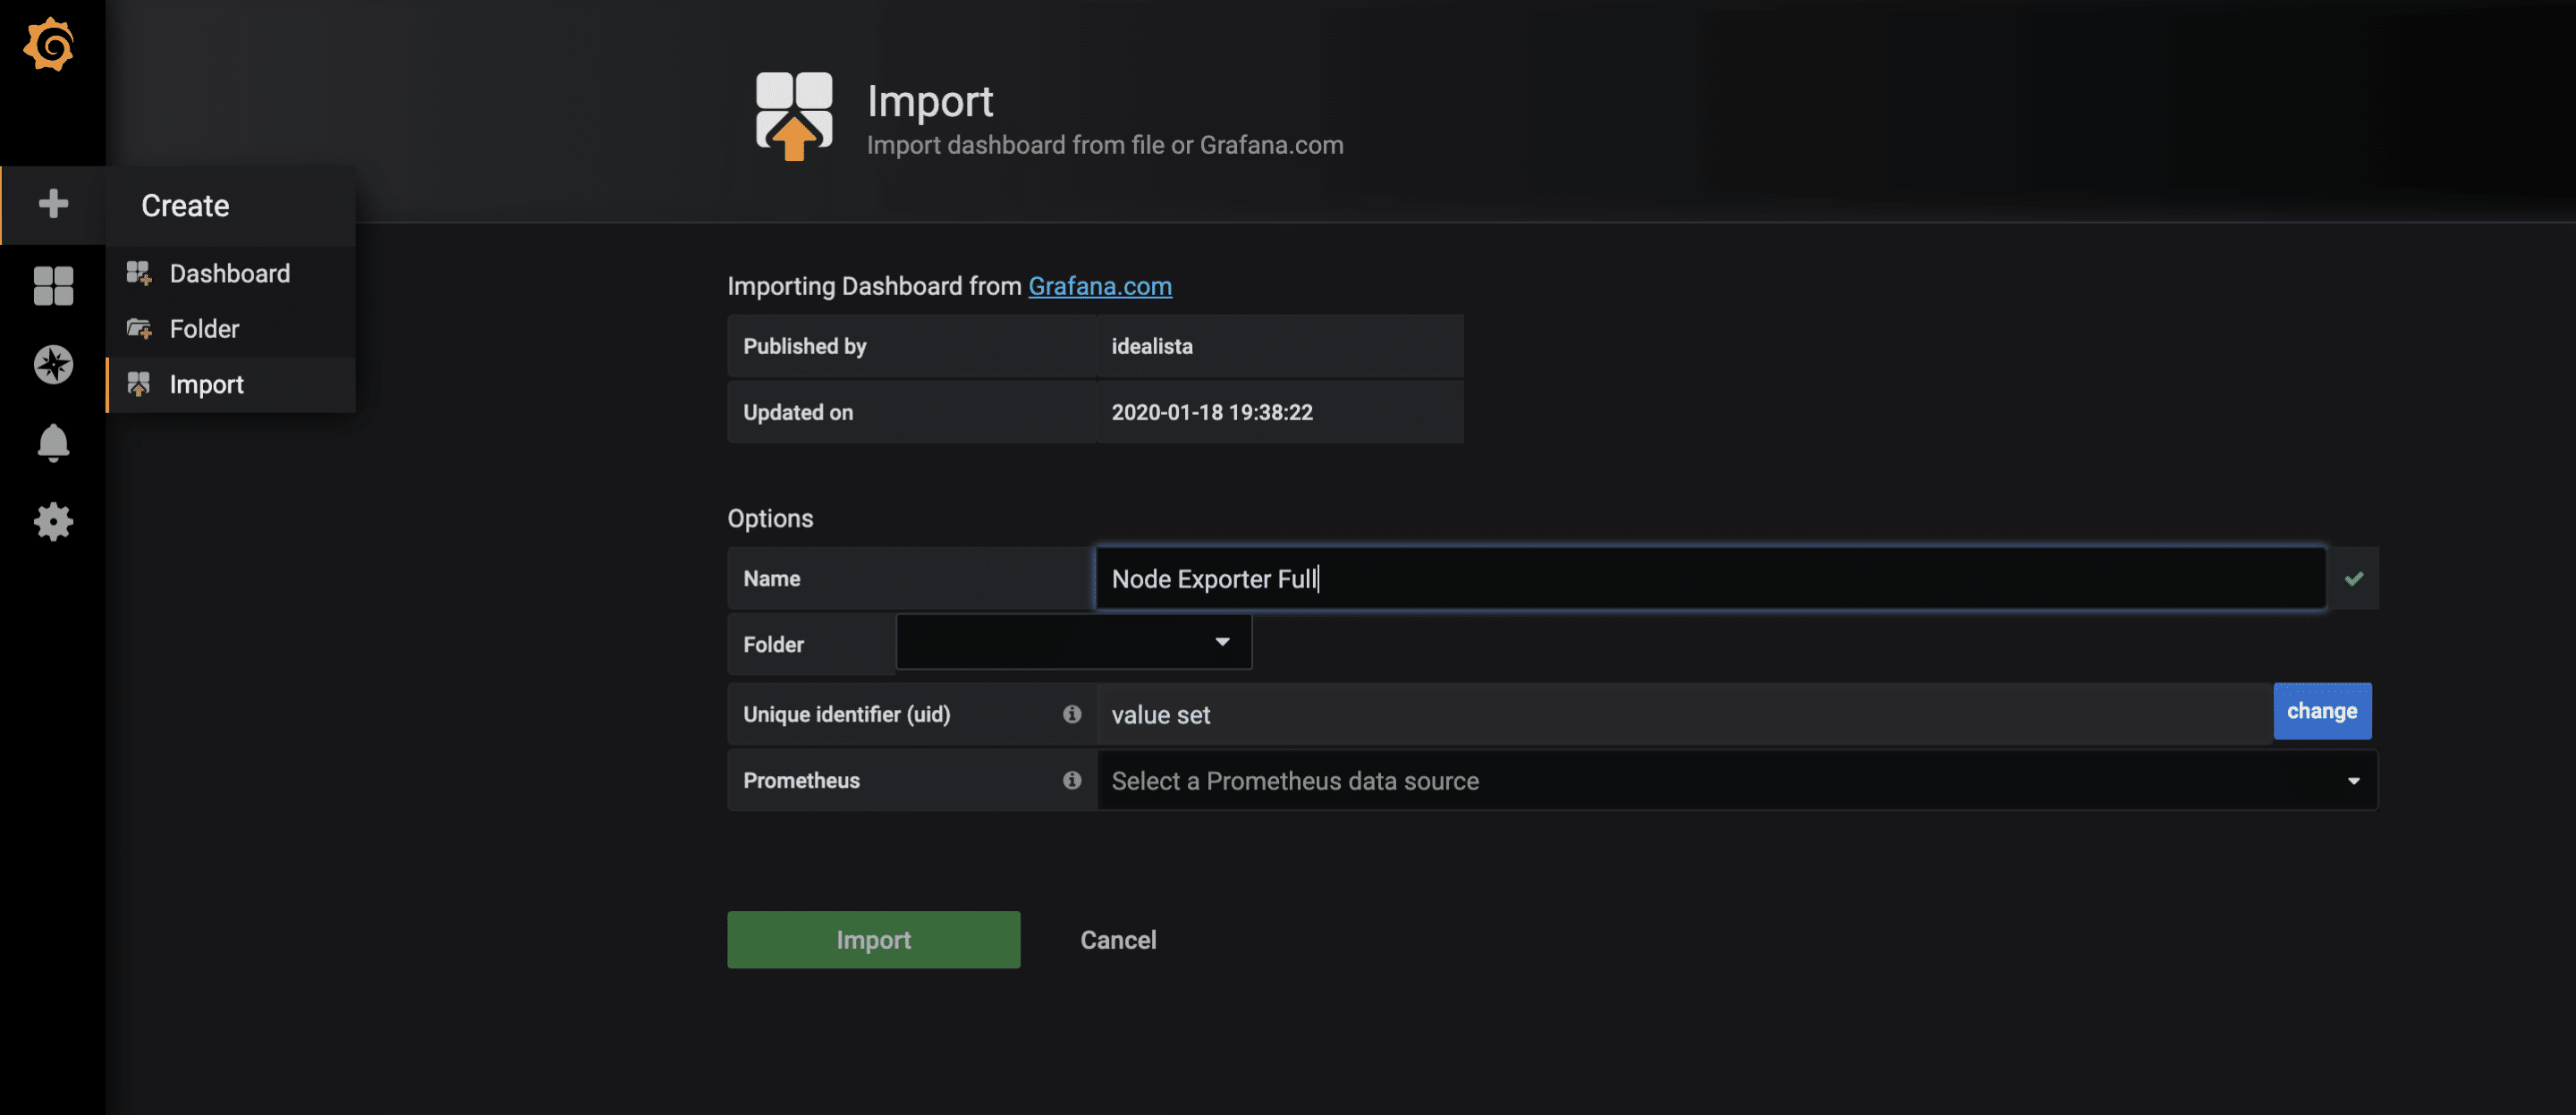
For the collected metrics of the node-exporter, there is already a very complete Grafana dashboard that can be imported via the import function. The ID of the dashboard is 1860.
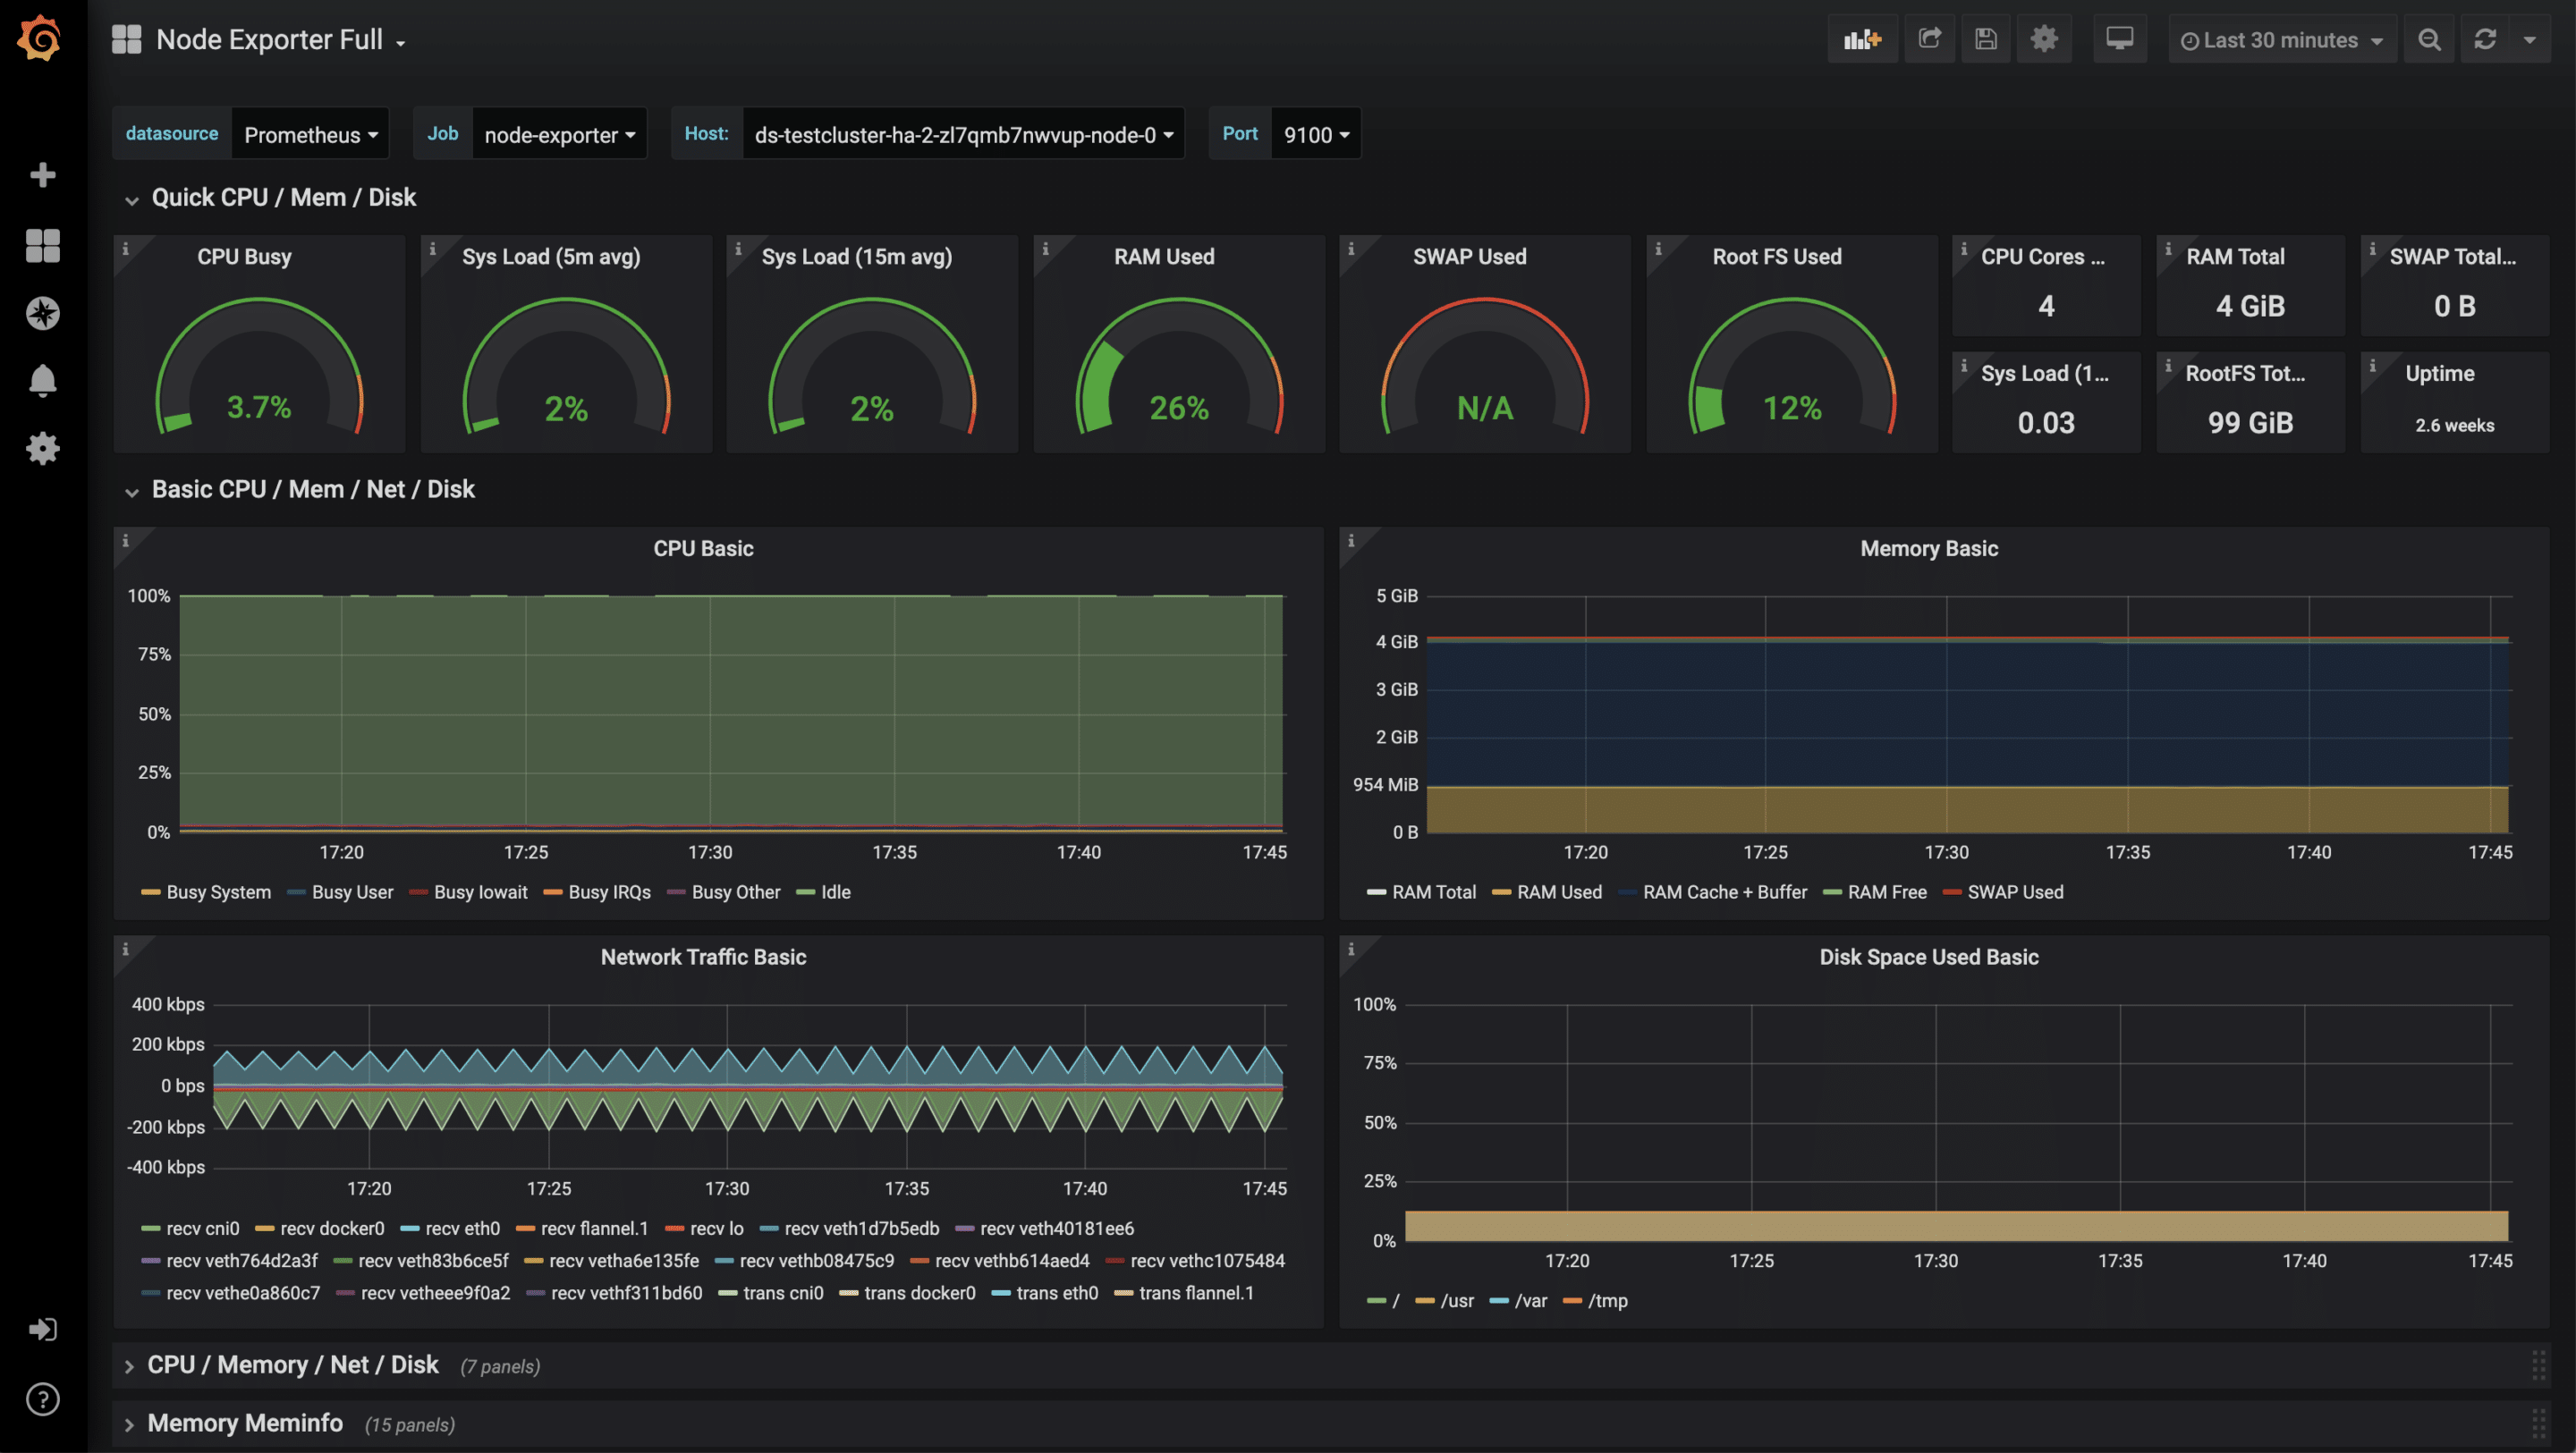
After the successful import of the dashboard, the metrics can now be examined.
Monitoring of further applications
In addition to these rather technical statistics, other metrics of your own applications are also possible, for example HTTP requests, SQL queries, business logic and much more. There are hardly any limits here due to the very flexible data format. To collect your own metrics, there are, as always, several approaches. One of them is to equip your application with a /metrics endpoint. Some frameworks such as Ruby on Rails already have useful extensions. Another approach are so-called sidecars. A sidecar is an additional container that runs alongside the actual application container. Together they form a pod that shares namespace, network, etc. The sidecar then runs code. The sidecar then runs code that checks the application and makes the results available to Prometheus as parseable values. Essentially, both approaches can be linked to the Prometheus operator, as in the example shown above.
by Sebastian Saemann | Apr 29, 2020 | Kubernetes, Tutorials
Managed Kubernetes vs. Kubernetes On-Premises – do I go for a Managed Kubernetes plan or am I better off running Kubernetes myself?
For some, of course, the question does not even arise in the first place, as it is strategically specified by the group or their own company. For everyone else, the following should help to provide an overview of the advantages and disadvantages of Managed Kubernetes plan and On-Premises and point out the technical challenges.
Why Kubernetes?
In order to attract readers who are not quite so familiar, I would like to start by mentioning why there is so much hype about Kubernetes and why you should definitely get involved with it.
Kubernetes is the clear winner in the battle for container orchestration. It is much more than just launching containers on a multitude of nodes. It’s how the application is decoupled and abstracted from the infrastructure. Text-based and versionable configuration files, a fairly complete feature set, the ecosystem of the Cloud Native Computing Foundation and other third-party integrations are currently a guarantee for the success of the framework. No wonder that it is currently – despite a relatively steep learning curve – a “developer’s darling”.
Kubernetes sees itself as a “First-Class-Citizen” of the cloud. Cloud here means the Infrastructure as a Service plan of hyperscalers such as AWS, Azure and Google, but of course also other hosters such as NETWAYS. Kubernetes feels particularly comfortable on the basis of this already existing IaaS infrastructure, because it reuses infrastructure services for storage and network, for example. What is also special about Kubernetes is that it is “cloud-agnostic”. This means that the cloud used is abstracted and one is independent of the cloud service provider. Multi-cloud strategies are also possible.
In our Webinar and our Kubernetes-Blogserie we show and explain how to get started with Kubernetes and its possibilities.
Managed Kubernetes
The easiest way to get a functional Kubernetes cluster is certainly to use a Managed Kubernetes Managed Kubernetes plan. Managed Kubernetes plans are ready for use after only a few clicks and thus in only a few minutes and usually include a managed Kubernetes control plane and associated nodes. As a customer, you have the choice of using a highly available Kubernetes API, which is ultimately used to serve the Kubernetes cluster. The provider then takes care of updates, availability and operation of the K8s cluster. Payment is based on the cloud resources used. There are only marginal differences in the billing model. Some providers advertise a free control plane, but the VM’s used cost more.
The technical features are comprehensive, but the differences between the plans are rather minimal. There are differences in the Kubernetes version used, the number of availability zones and regions, the option for high-availability clusters and auto-scaling, or whether an activated Kubernetes RBAC implementation is used, for example.
The real advantage of a Managed Kubernetes plan is that you can get started immediately, you don’t need operational data centre and Kubernetes expertise and you can rely on the expertise of the respective provider.
Kubernetes On-Premises
In total contrast to this is the option of operating Kubernetes in your own data centre. In order to achieve cloud-like functionality in your own data centre, the Managed Kubernetes plan would have to be replicated as closely as possible. This is quite a challenge – that much can be revealed in advance. If you are lucky, you will already be operating some of the necessary components. Technically, there are some challenges:
For the deployment of one or more Kubernetes clusters and to ensure consistency, it is advisable – if not mandatory – to set up an automatic deployment process, namely configuration management with e.g. Ansible or Puppet in combination with the bootstrapping tool kubeadm. Alternatively, there are projects like kubespray that can deploy Kubernetes clusters with Ansible playbooks.
In addition to the actual network in which the nodes are located, Kubernetes forms an additional network within the cluster. One challenge is choosing the appropriate container network interface. Understanding solutions that use technologies such as VXLAN or BGP is also mandatory and helpful. Additionally, there is a special feature for ingress traffic that is routed into the cluster network. For this type of traffic, you usually create a Kubernetes service object with the type “load balancer”. Kubernetes then manages this external load balancer. This is not a problem in an IaaS Cloud mit LBaaS functionalilty, but it may be more difficult in a data centre. Proprietary load balancers or the open source project MetalLB can be helpful.
Similar to the selection of the appropriate CNI, it is sometimes difficult to select the right storage volume plugin. Of course, the appropriate storage must also be operated. Ceph, for example, is popular and suitable.
Readers can probably quickly answer for themselves whether they want to face these technical challenges. However, they should by no means be underestimated.
In return for the hard and rather rocky road, you definitely get independence from third parties and full control over your IT with your own setup. The know-how you learn can be just as valuable. Financially, it depends strongly on already existing structures and components whether there is an actual advantage. If one compares only the costs for compute resources, it may well be cheaper. However, the enormous initial time expenditure for evaluation, proof of concept, setup and the subsequent constant effort for operation should not be neglected.
Conclusion
As always, there are advantages and disadvantages for the two variants described, Managed Kubernetes and Kubernetes On-Premises. Depending on the company, structure and personnel, there are certainly good reasons to choose one or the other variant. Of course, there are also manufacturers who attempt the balancing act between both worlds. Which type is the most efficient and sensible for a company must therefore be answered on an individual basis.
If you are leaning towards a Managed solution, there are good reasons to choose a NETWAYS Managed Kubernetes plan. For example, there is our dedicated team with our competent MyEngineers, who successfully accompany our customers on their way into the world of containers. Another reason is the direct and personal contact with us. Other good reasons and advantages my colleagues or I are also happy to explain personally.


Recent Comments