In one of our first tutorials, we showed you how to get started with ingress-nginx on your Kubernetes cluster. As a next step, we will tell you how to go about securing ingress-nginx with cert-manager by creating TLS certificates for your services!
What is cert-manager?
cert-manager is an incubating CNCF project for automatic or programmatic provisioning of TLS certificates. It watches annotated resources (e.g. Ingress objects) and a set of CustomResourceDefinitions to request, create, and renew certificates for your workloads.
On the provider side, it supports certificate authorities or other providers such as ACME, GlobalSign, Hashicorp Vault, or Cloudflare Origin CA.
With this initial question answered, let’s get started with securing ingress-nginx with cert-manager!
Installing ingress-nginx
In order to secure ingress-nginx, we need to install ingress-nginx! We will do so using Helm, a package manager for Kubernetes. Installing applications to Kubernetes using Helm is similar to installing packages on an operating system:
- Configure the repository
- Fetch available packages and versions
- Install a package
With Helm, those three steps look like follows:
helm repo add ingress-nginx https://kubernetes.github.io/ingress-nginx
helm repo update
helm install --namespace ingress-nginx --create-namespace ingress-nginx ingress-nginx/ingress-nginx
Why 4x ingress-nginx?!
When the installation command terminates, ingress-nginx will be ready for serving traffic to your cluster! We can go on to installing cert-manager next.
Installing cert-manager
Installing cert-manager is very similar to installing ingress-nginx – we can use Helm again. Add the repository, sync it, and install cert-manager to your cluster. Make sure to add the extra variable installCRDs which will install the aforementioned CustomResourceDefinitions for cert-manager along with the application.
helm repo add jetstack https://charts.jetstack.io/
helm repo update
helm install --namespace cert-manager --create-namespace cert-manager jetstack/cert-manager --set installCRDs=true
Just like with ingress-nginx, cert-manager is readily available to handle TLS certificate creation as soon as the installation command terminates – we’re just missing an Issuer CRD.
Creating an Issuer
As mentioned before, cert-manager integrates with many different certificate vendors but needs to know which one to use for a specific certificate request. This can be configured using cert-manager’s Issuer CRD.
For this tutorial, we will use the ACME issuer, which utilizes Let’s Encrypt to issue valid TLS certificates for our services:
---
apiVersion: cert-manager.io/v1
kind: ClusterIssuer
metadata:
  name: letsencrypt-staging
  namespace: cert-manager
spec:
  acme:
    # You must replace this email address with your own.
    # Let's Encrypt will use this to contact you about expiring
    # certificates, and issues related to your account.
    email: daniel@example.com
    # we will only use the staging API for this tutorial
    server: https://acme-staging-v02.api.letsencrypt.org/directory
    privateKeySecretRef:
      # Secret resource that will be used to store the account's private key.
      name: acme-staging-key
    # Add a single challenge solver, HTTP01 using nginx
    solvers:
      - http01:
          ingress:
            ingressClassName: nginx
This Issuer declaration will use Let’s Encrypt’s Staging API to issue valid (but untrusted) certificates to our services. It is configured to use HTTP01 challenges hosted by your previously installed ingress-nginx to validate our services (read more about Let’s Encrypt’s Challenge types here).
If you look closely, you can also see that we actually defined a ClusterIssuer , which is an Issuer that can be used and referenced cluster-wide.
You can go ahead and deploy this ClusterIssuer to your cluster like this:
kubectl apply -f clusterissuer.yml
For our Ingress to work though, we need one more thing: Connectivity.
Preparing the Ingress
If we want to connect to our Ingress and generate a TLS certificate, we need a DNS entry.
And for a DNS entry, we need our clusters’ Ingress IP. This is the IP ingress-nginx uses for its service of type LoadBalancer , which is in charge of routing traffic into our cluster.
Creating a DNS entry
You can retrieve the publicly reachable IP of your ingress-nginx service by executing the following command:
kubectl get svc -n ingress-nginx ingress-nginx-controller -o jsonpath={.status.loadBalancer.ingress[0].ip}
With the public IP address retrieved, you can go ahead and create an A entry for one of your (sub)domains with your DNS provider. How to do this depends on your provider and is out of the scope of this tutorial.
Installing a Demo Application
The last missing piece of our secure-ingress-puzzle is an application to access from our browsers. We will deploy podinfo, an often-used demo application that comes with a web frontend.
Once more, we will use Helm for the installation:
helm repo add podinfo https://stefanprodan.github.io/podinfo
helm repo update
helm install --namespace podinfo --create-namespace podinfo podinfo/podinfo
After a short while, the application should be deployed to our clusters, with a ClusterIP service we can reference in our Ingress resource in the next step.
Securing ingress-nginx with cert-manager
We now got all necessary bits and pieces to install and secure our Ingress, all in one go:
apiVersion: networking.k8s.io/v1
kind: Ingress
metadata:
  annotations:
    cert-manager.io/cluster-issuer: letsencrypt-staging
  name: podinfo
  namespace: podinfo
spec:
  ingressClassName: nginx
  rules:
  - host: podinfo.cluster.example.com
    http:
      paths:
      - pathType: Prefix
        path: /
        backend:
          service:
            name: podinfo
            port:
              number: 9898
  tls: # < placing a host in the TLS config will determine what ends up in the cert's subjectAltNames
  - hosts:
    - podinfo.cluster.example.com
    secretName: podinfo1-tls
Note a few things:
- we create the
Ingressin the samenamespacethat we deployed podinfo to - we add an annotation, which will get picked up by cert-manager and tells it to use the
ClusterIssuerletsencrypt-staging to issue a certificate - our
Ingresswill route traffic to https://podinfo.cluster.example.com/ to our podinfo service - we also specify a hostname for the SAN of the certificate as well as a certificate name
Once you’re satisfied with the configuration of your Ingress, you can go ahead and deploy it:
kubectl apply -f ingress.yml
We will now have to wait 1-2 minutes for a few things to happen:
- cert-manager to pick up on the annotation and…
- …create another temporary
Ingressfor the HTTP01-Challenge to be solved - …create the requested
CertificateCRD - …create the corresponding secret podinfo1-tls to be used by the
Ingress
- …create another temporary
- ingress-nginx to update the
Ingresswith the publicly reachable address.
Once all those steps succeeded, we can open https://podinfo.cluster.example.com/ in our browsers – you should be greeted by the notorious “Your Connection is not secure” screen of your browser.
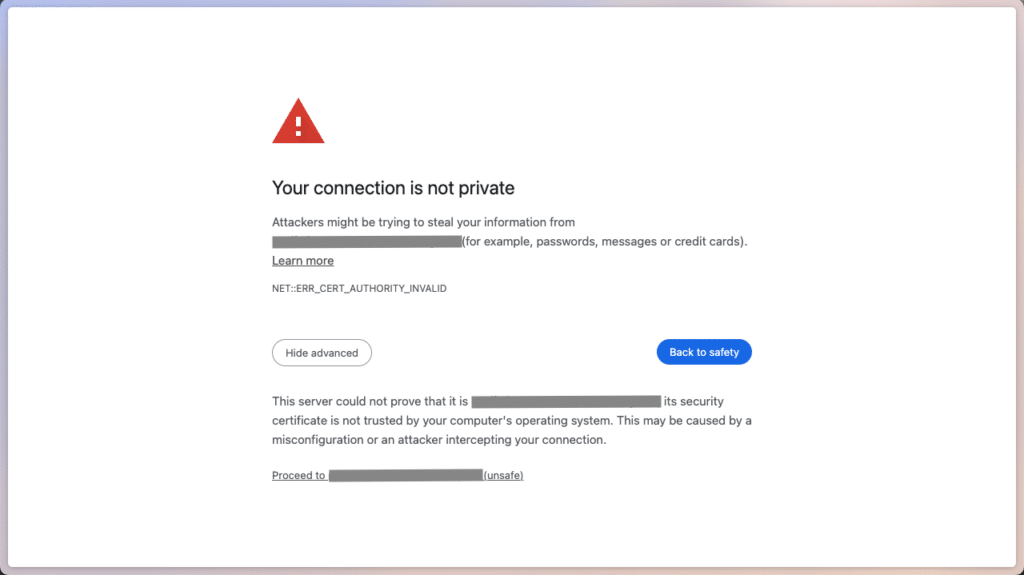
Our certificates won’t get recognized by most web bowsers
This is happening because we specified Let’s Encrypt’s Staging API as issuer for our certificates. After clicking on Show advanced and confirming Proceed to https://podinfo.cluster.example.com/, we will get forwarded to podinfo anyways:
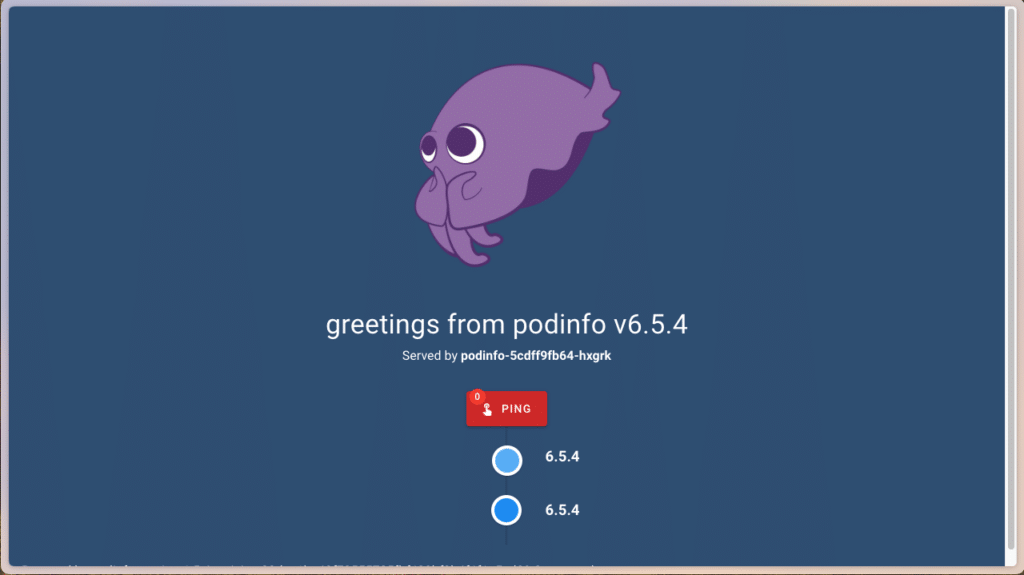
Podinfo’s squid is happily greeting us
It worked! We’re greeted by Podinfo’s mascot, a little squid, applauding us for configuring our Ingress and Issuer correctly.
We can also verify our certificate got issued by cert-manager by inspecting the certificate details in our browsers:
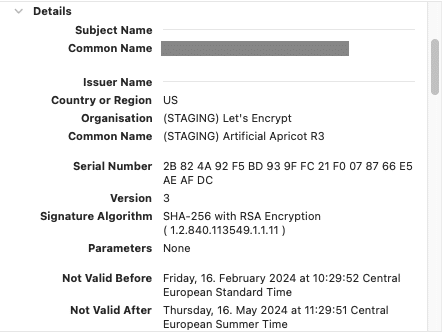
The certificate was issued by Let’s Encrypt’s STAGING issuer.
Conclusion
We did it – we secured our ingress-nginx with cert-manager and Let’s Encrypt! All we needed was a ClusterIssuer referencing Let’s Encrypt’s (staging) API, and a matching annotation in our Ingress configuration.
If you feel adventurous, you could now go ahead and use Let’s Encrypt’s production API by removing the staging part from the Issuer’s URL, and the browser warning regarding the certificate should go away.
Furthermore, if you’re already deploying other applications with Helm, more often than not there’s predefined values for ingress annotations or even built-in cert-manager support for provisioning certificates – check it out!
If this tutorial was too fast-paced for you or you got further questions regarding your Kubernetes deployments and connectivity, don’t hesitate to give our MyEngineers a call – they’d be more than happy to talk to you!