

Die gewissenhafte Absicherung deiner IT-Landschaft hat in den vergangenen Jahren mehr und mehr an Bedeutung gewonnen. Mit einem stetigen Anstieg an (Nutzer-)daten, die verwaltet, verarbeitet, und gespeichert werden müssen, sollte die Verschlüsselung dieser Daten auf deiner Agenda für eine ganzheitlich abgesicherte IT-Infrastruktur stehen.
Deswegen schauen wir uns in diesem Tutorial an, wie LUKS verschlüsselter Speicher auf OpenStack bei der Absicherung deiner Volumes im Ruhezustand helfen kann. Wir schauen uns zwei Herangehensweisen an, verschlüsselte Volumes in OpenStack zu definieren und zu nutzen: via Weboberfläche und via OpenStack CLI. Starten werden wir mit der Weboberfläche.
Voraussetzungen
Um dieses Tutorial auf NWS OpenStack nachzustellen, benötigst du eine NWS ID. Du brauchst außerdem ein OpenStack Projekt, in dem du Volumes und Server erstellen kannst.
Möchtest du das Tutorial in deinem Terminal nachstellen, musst du zusätzlich noch die OpenStackRC-Datei für dein Projekt herunterladen.
Solltest du eine Auffrischung brauchen, wie diese Dinge ablaufen, wirf doch einen schnellen Blick auf unser Tutorial Projekt starten und den ersten Server anlegen.
Konfiguration von LUKS verschlüsseltem Speicher im Dashboard
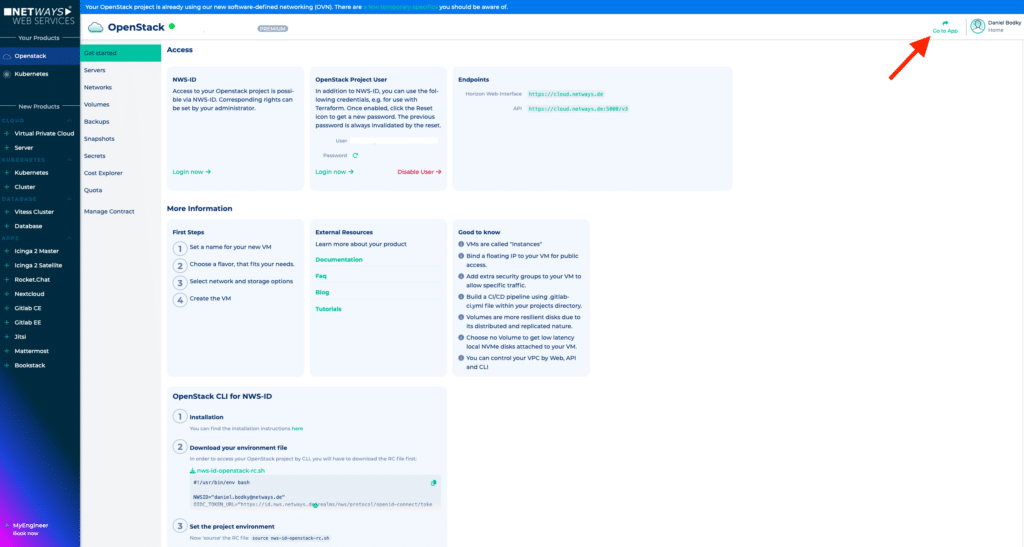
Zuerst schauen wir uns an, wie LUKS verschlüsselter Speicher auf OpenStack über Horizon, OpenStacks Weboberfläche, bereitgestellt werden kann. Wenn du ein NWS-Kunde bist, kannst du Horizon entweder über https://cloud.netways.de erreichen und dich mit deiner NWS ID einloggen, oder du klickst in deiner Projektübersicht auf MyNWS auf den „Go to App“ Button oben rechts.
Erstellen eines neuen LUKS verschlüsselten Volumes
Erstellen eines neuen LUKS verschlüsselten Volumes
Bist du im Horizon Dashboard angekommen, navigiere über Volumes > Volumes zur Volumeübersicht deines Projekts und klicke auf Create Volume oben rechts. Es öffnet sich ein Konfigurationsdialog, in dem du die gewünschten Einstellungen für das neue Volume angeben kannst:
- Volume Name – wähle einen aussagekräftigen Namen für dein Volume, bspw.
encryption-tutorial-volume - Description – füge Informationen zu deinem Volume hinzu, falls erwünscht
- Volume Source – wähle zwischen einem leeren Volume und dem Import eines existierenden Images
- Type – die wichtigste Einstellung, die u.A. bestimmt, ob das Volume verschlüsselt wird oder nicht – mehr dazu später
- Size – die gewünschte Größe des Volumes
- Availability Zone – wo OpenStack das Volume speichern soll; in NWS OpenStack existiert nur eine Availability Zone (nova)
- Group – füge das Volume zu existierenden Volumegruppen hinzu, falls gewünscht
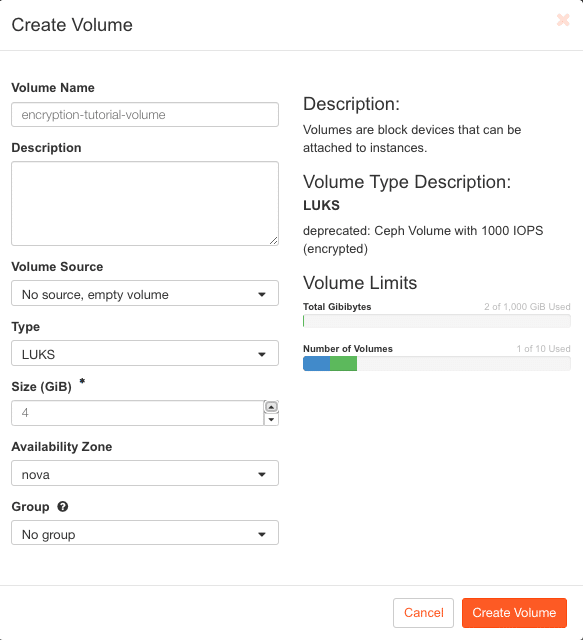
In obigem Screenshot Screenshot ist das Volume für den Typ LUKS konfiguriert, was der Volumetyp für LUKS verschlüsselten Speicher auf NWS OpenStack ist. Ich habe außerdem sichergestellt, dass ein neues, leeres Volume erstellt wird, und die Größe auf 4GB gesetzt.
Stellst du das Tutorial auf einer anderen OpenStackumgebung als NWS OpenStack nach, kann es sein, dass der Volumetyp anders benannt ist.
Bist du zufrieden mit den Einstellungen, kannst du auf Create Volume klicken und ein paar Augenblicke warten. OpenStack erstellt in der Zwischenzeit ein neues, LUKS verschlüsseltes Volume für dich. Im nächsten Schritt können wir das Volume in einen Server einbinden.
Einbinden von LUKS verschlüsselten Volumes
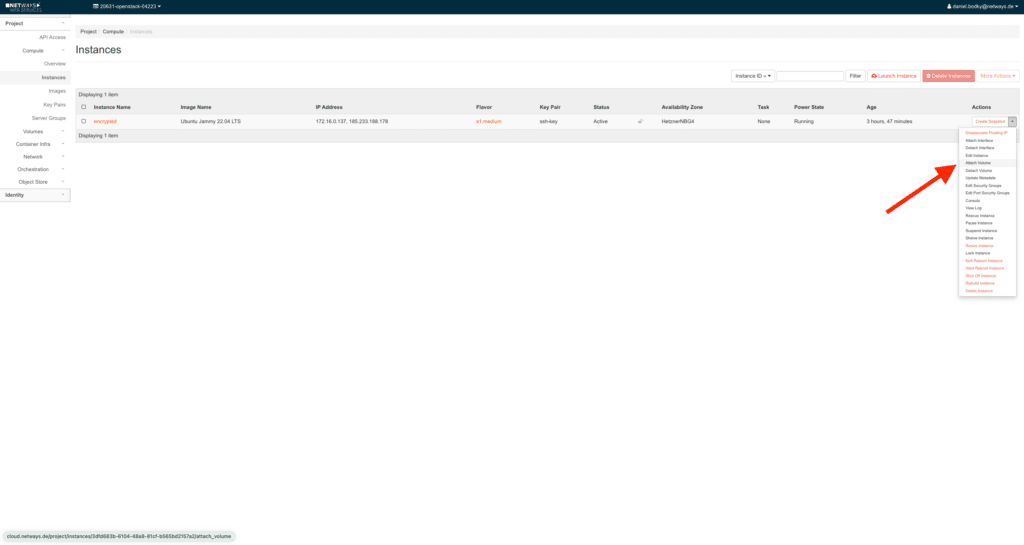
Ein Volume alleine bringt dich nicht weiter, egal ob verschlüsselt oder nicht – du brauchst einen Client, der es nutzt. Im Rahmen dieses Tutorials werden wir hierfür einen neuen Server in OpenStack erstellen. Das geht entweder über das Dashboard in MyNWS oder durch einen Klick auf Launch Instance in Horizon unter Compute > Instances.
Sobald der Server läuft, können wir das verschlüsselte Volume in Horizon einbinden: Klappe das Dropdownmenü in der Action Spalte der Serverübersicht aus, und wähle Attach Volume von den verfügbaren Aktionen.
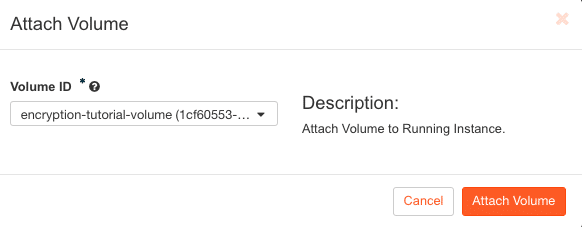
Ein weiterer Popupdialog öffnet sich, und bietet verfügbare Volumes zum Einbinden an. Wähle das im vorherigen Schritt erstellte LUKS verschlüsselte Volume und bestätige mit einem Klick auf Attach Volume:
Das war’s auch schon – das verschlüsselte Volume ist nun auf dem Server eingebunden. Wenn du dich an deinem Server einloggst (bspw. via SSH), solltest du ein neues Storage Device sehen können (vmtl. /dev/sdb). Du kannst das neue Volume wie jedes andere verwenden, OpenStack hat es zu diesem Zeitpunkt bereits für dich entschlüsselt.
An dieser Stelle noch einmal der Hinweis: LUKS verschlüsselte Volumes sichern deine Daten im Ruhezustand, allerdings nicht in Bewegung – das gilt es bei der Evaluierung deiner IT-Sicherheit zu beachten!
Konfiguration von LUKS verschlüsseltem Speicher im Terminal
Solltest du das Terminal und OpenStacks CLI der Weboberfläche vorziehen, gibt es auch dort natürlich die Möglichkeit, LUKS verschlüsselten Speicher für OpenStack zu konfigurieren.
Downloade deine OpenStackRC.sh Datei, source sie, und wähle das OpenStack-Projekt, auf dem du arbeiten möchtest:
source ~/Downloads/nws-id-openstack-rc.sh

Testing authentication and fetching project list ...

Please select one of your OpenStack projects.

1) aaaaa-openstack-bbbbb
2) ccccc-openstack-ddddd
3) eeeee-openstack-fffff
4) ggggg-openstack-hhhhh
5) iiiii-openstack-jjjjj
6) kkkkk-openstack-lllll
7) mmmmm-openstack-nnnnn
8) ooooo-openstack-ppppp
Enter a number: 1
Selected project: aaaaa-openstack-bbbbbHast du eines deiner Projekte gewählt, kannst du als nächstes ein verschlüsseltes Volume erstellen.
Erstellen eines neuen LUKS verschlüsselten Volumes
Zuerst musst du den Storagetypen deines OpenStackprojekts identifizieren, der LUKS verschlüsselten Speicher unterstützt. Eine Liste aller verfügbaren Storagetypen kannst du dir mit folgendem Befehl ausgeben lassen:
openstack volume type list
+--------------------------------------+--------------------------+-----------+
| ID                                   | Name                     | Is Public |
+--------------------------------------+--------------------------+-----------+
| 2f487bd6-628d-46ba-83c5-21c6dbb4c67d | Ceph-Encrypted           | True      |
| e0704085-2e47-4e3d-b637-ae04e78f5000 | Ceph-Encrypted-High-IOPS | True      |
| 21b793e6-8adf-4c92-9bf9-14f5a7b6161a | LUKS                     | True      |
| 664b6e93-0677-4e11-8cf1-4938237b6ce2 | __DEFAULT__              | True      |
| 0a65e62f-3aad-4c6d-b175-96dedaa7ba1f | Ceph-High-IOPS           | True      |
| c4a685b0-64c4-4565-9b4c-9800056d659d | Ceph                     | True      |
+--------------------------------------+--------------------------+-----------+In NWS OpenStack heißt der für LUKS Verschlüsselung zuständige Storagetyp bequemerweise LUKS.
Als nächstes kannst du nun ein neues Volume erstellen und den gewünschten Storagetypen referenzieren:
openstack volume create --type LUKS --size 4 encryption-tutorial-volume
+---------------------+------------------------------------------------------------------+
| Field               | Value                                                            |
+---------------------+------------------------------------------------------------------+
| attachments         | []                                                               |
| availability_zone   | nova                                                             |
| bootable            | false                                                            |
| consistencygroup_id | None                                                             |
| created_at          | 2024-03-04T12:41:29.000000                                       |
| description         | None                                                             |
| encrypted           | True                                                             |
| id                  | 9b20a1d8-bfb6-4e4f-bb4b-dbda62e4afc7                             |
| multiattach         | False                                                            |
| name                | encryption-tutorial-volume                                       |
| properties          |                                                                  |
| replication_status  | None                                                             |
| size                | 4                                                                |
| snapshot_id         | None                                                             |
| source_volid        | None                                                             |
| status              | creating                                                         |
| type                | LUKS                                                             |
| updated_at          | None                                                             |
| user_id             | acfef1ea27ec3ac25fa5009238cdeb2cc5ae2c943da7ecb279c43a5a91b8a4bf |
+---------------------+------------------------------------------------------------------+Im obigen Beispiel habe ich ein Volume namens encryption-tutorial-volume mit einer Größe von 4GB erstellt.
Als nächstes musst du das erstellte Volume in einem Server einbinden.
Einbinden von LUKS Encrypted Volumes
Um das Volume einbinden zu können, brauchst du einen Server, an den du es anschließen kannst. Erstelle also mit folgendem Befehl einen neuen Server in deinem OpenStack-Projekt, oder nutze das MyNWS oder Horizon Dashboard dafür:
openstack server create --flavor s1.small --image "Debian 10" \
--network public-network test-serverDieser Befehl funktioniert standardmäßig in jedem NWS OpenStack-Projekt – wenn du dieses Tutorial auf einer anderen OpenStack-Umgebung nachstellst, kann es sein, dass du die Referenzen auf Flavor, Image und Network anpassen musst.
Ist der Server erst einmal gestartet, kannst du das Volume wie folgt an den Server anschließen:
openstack server add volume --device /dev/sdb test-server encryption-tutorial-volume
+-----------------------+--------------------------------------+
| Field                 | Value                                |
+-----------------------+--------------------------------------+
| ID                    | 9b20a1d8-bfb6-4e4f-bb4b-dbda62e4afc7 |
| Server ID             | 7952e17d-0781-41c3-a1e9-b758574ac336 |
| Volume ID             | 9b20a1d8-bfb6-4e4f-bb4b-dbda62e4afc7 |
| Device                | /dev/sdb                             |
| Tag                   | None                                 |
| Delete On Termination | False                                |
+-----------------------+--------------------------------------+Loggst du dich nun in deinen Server ein (bspw. via SSH), siehst du das neue Storage Device als /dev/sdb. Du kannst nun direkt damit arbeiten wie mit jedem anderen Volume auch: Formatierung, Mount und Benutzung funktionieren sofort – OpenStack hat den Block Storage bereits im Hintergrund entschlüsselt.
Fassen wir zusammen
OpenStack bietet Alles, was zur Verschlüsselung deiner Volumes im Ruhezustand benötigt wird. Du kannst entweder über OpenStacks Horizon Dashboard oder über seine CLI Block Storage Volumes erstellen, verschlüsseln und anbinden, ohne die Konfiguration deiner Server anpassen zu müssen.
Das Feature verursacht kaum zusätzliche Kosten (OpenStack speichert den LUKS Verschlüsselungs-Key als Secret in Barbican, OpenStacks Key Manager – dadurch entstehen geringe Fixkosten pro Secret) und ist ein „Quick Win“ für die Absicherung deiner IT-Infrastruktur.


0 Kommentare