You want to know how to get the IP addresses of your clients in your Kubernetes cluster? In five minutes you have an overview!
From HTTP client to application
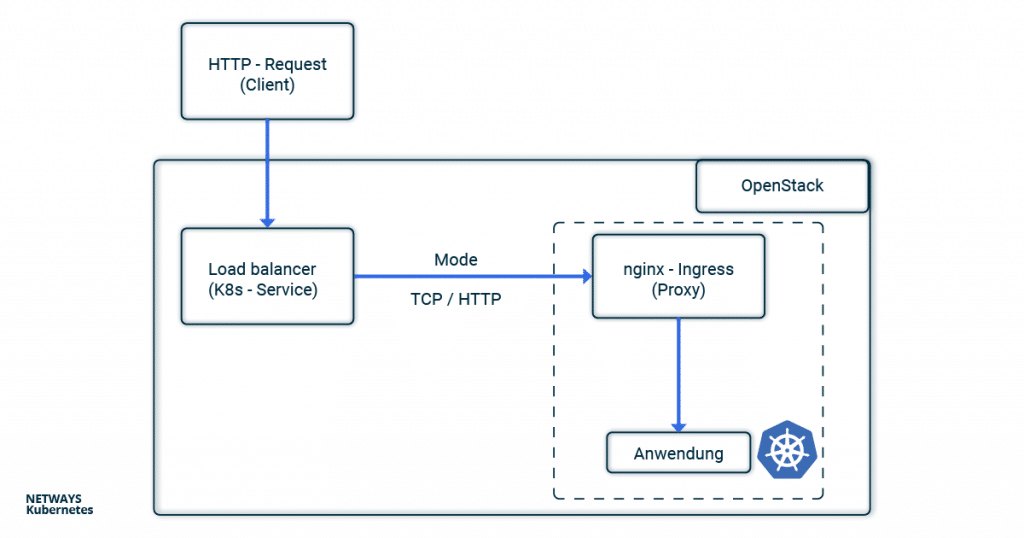
In the nginx-Ingress-Controller tutorial, we showed how to make an application publicly accessible. In the case of the NETWAYS Cloud, your Kubernetes cluster uses an Openstack load balancer, which forwards the client requests to an nginx ingress controller in the Kubernetes cluster. This then distributes all requests to the corresponding pods.
With all the pushing around and forwarding of requests, the connection details of the clients get lost without further configuration. Since the problem has not only arisen since Kubernetes, the tried and tested solutions X-Forwarded-For or Proxy-Protocol are used.
In order not to lose track in the buzzword bingo between service, load balancer, ingress, proxy, client and application, you can look at the path of an HTTP request from the client to the application through the components of a Kubernetes cluster in this example.
Client IP Addresses with X-forwarded-for
If you use HTTP, the client IP address can be stored in the X-forwarded-For (XFF) and transported further. XFF is an entry in the HTTP header and is supported by most proxy servers. In this example, the load balancer places the client IP address in the XFF entry and forwards the request. All other proxy servers and the applications can therefore recognise in the XFF entry from which address the request was originally sent.
In Kubernetes, the load balancer is configured via annotations in the service object. If you set loadbalancer.openstack.org/x-forwarded-for: true there, the load balancer is configured accordingly. Of course, it is also important that the next proxy does not overwrite the X-Forwarded-For header again. In the case of nginx, you can set the option use-Forwarded-headers in its ConfigMap.
---
# Service
kind: Service
apiVersion: v1
metadata:
  name: loadbalanced-service
  annotations:
    loadbalancer.openstack.org/x-forwarded-for: "true"
spec:
  selector:
    app: echoserver
  type: LoadBalancer
  ports:
  - port: 80
    targetPort: 8080
    protocol: TCP
---
# ConfigMap
apiVersion: v1
kind: ConfigMap
metadata:
  name: nginx
data:
  use-forwarded-headers: "true"
Since the HTTP header is used, it is not possible to enrich HTTPS connections with the client IP address. Here, one must either terminate the TLS/SSL protocol at the load balancer or fall back on the proxy protocol.
Client Information with Proxy Protocol
If you use X-Forwarded-For, you are obviously limited to HTTP. In order to enable HTTPS and other applications behind load balancers and proxies to access the connection option of the clients, the so-called proxy protocol was invented. Technically, a small header with the client’s connection information is added by the load balancer. The next hop (here nginx) must of course also understand the protocol and handle it accordingly. Besides classic proxies, other applications such as MariaDB or postfix also support the proxy protocol.
To activate the proxy protocol, you must add the annotation loadbalancer.openstack.org/proxy-protocol to the service object. The protocol must also be activated for the accepting proxy.
---
# Service Loadbalancer
kind: Service
apiVersion: v1
metadata:
  name: loadbalanced-service
  annotations:
    loadbalancer.openstack.org/proxy-protocol: "true"
spec:
  selector:
    app: echoserver
  type: LoadBalancer
  ports:
  - port: 80
    targetPort: 8080
    protocol: TCP
---
# NGINX ConfigMap
apiVersion: v1
kind: ConfigMap
metadata:
  name: nginx
data:
  use-proxy-protocol: "true"
In most cases, however, you will fall back on the Helm chart of the nginx ingress controller. There, a corresponding configuration is even easier.
nginx-Ingress-Controller and Helm
If you use Helm to install the nginx-ingress-controller, the configuration is very clear. The proxy protocol is activated for both the nginx and the load balancer via the Helm values file:
nginx-ingress.values:
---
controller:
  config:
    use-proxy-protocol: "true"
  service:
    annotations:
      loadbalancer.openstack.org/proxy-protocol: true
    type: LoadBalancer
$ helm install my-ingress stable/nginx-ingress -f nginx-ingress.values
The easiest way to test whether everything works as expected is to use the Google Echoserver. This is a small application that simply returns the HTTP request to the client. As described in the nginx-Ingress-Controller tutorial, we need a deployment with service and ingress. The former starts the echo server, the service makes it accessible in the cluster and the ingress configures the nginx so that the requests are forwarded to the deployment.
---
# Deployment
apiVersion: apps/v1
kind: Deployment
metadata:
  name: echoserver
spec:
  selector:
    matchLabels:
      app: echoserver
  replicas: 1
  template:
    metadata:
      labels:
        app: echoserver
    spec:
      containers:
      - name: echoserver
        image: gcr.io/google-containers/echoserver:1.8
        ports:
          - containerPort: 8080
---
# Service
apiVersion: v1
kind: Service
metadata:
  name: echoserver-svc
spec:
  ports:
  - port: 80
    targetPort: 8080
    protocol: TCP
    name: http
  selector:
    app: echoserver
---
# Ingress
apiVersion: networking.k8s.io/v1beta1
kind: Ingress
metadata:
  name: echoserver-ingress
spec:
  rules:
  - host: echoserver.nws.netways.de
    http:
      paths:
        - backend:
            serviceName: echoserver-svc
            servicePort: 80
For testing purposes, it’s best to fake your /etc/hosts so that echoserver.nws.netways.de points to the public IP address of your nginx ingress controller. curl echoserver.nws.netways.de will then show you everything that the echo server knows about your client, including the IP address in the X-Forwarded-For header.
Conclusion
In the Kubernetes cluster, the proxy protocol is probably the better choice for most use cases. The well-known Ingress controllers support the proxy protocol and TLS/SSL connections can be configured and terminated in the K8s cluster. The quickest way to find out what information arrives at your application is to use Google’s echo server.