

Choosing the right platform for running Kubernetes workloads is an important strategic decision. Managed Kubernetes services offer a quick and easy way to deploy and manage Kubernetes clusters, but they often come with limitations in terms of flexibility and control.
For those looking for more customization options or greater integration with their existing OpenStack infrastructure, installing Talos Linux on OpenStack is an interesting alternative.
In this blog post, we will show you how to install Talos Linux on OpenStack using Terraform and thus create the basis for a secure, lightweight Kubernetes cluster.
The NETWAYS Cloud and NETWAYS Managed Kubernetes leave all options open to you.
Why Talos Linux?
alos is an extremely lightweight Linux distribution that was explicitly designed for the operation of Kubernetes. Consequently, it differs fundamentally from other distributions such as Ubuntu, Fedora, or RHEL.
Some of the most important differences between Talos and other standard distributions are
- the minimalist design: Talos Linux only needs 12 binaries! There is no shell, no interpreters for programming languages such as Python etc., and not even a package manager.
- the communication model: communication, installation and configuration of Talos takes place exclusively via API – no more SSH vulnerabilities!
- the file system: Talos Linux relies on an unchangeable root file system, on which only individual files can be changed as overlayfs (e.g.
/etc/host). - the focus on Kubernetes: Talos Linux was designed specifically for Kubernetes. Creation, troubleshooting and upgrades of Kubernetes clusters can be carried out directly via Talos API in a secure manner.
Now that we’ve given you a brief overview of its benefits, let’s tackle the installation of Talos Linux on OpenStack!
Our installation plan
As mentioned at the beginning, we will use Terraform for the installation of Talos Linux on OpenStack.
Infrastructure as Code(IaC) offers a number of advantages over manual installation, including reproducibility, speed and security. Typical errors of manual operation (e.g. typing errors) can be ruled out from the outset.
You can use both tools for this tutorial – simply replace
terraform with tofu if necessary.
We will divide the installation process into three steps:
- Initialization of the Terraform project: Before we can work with Terraform on OpenStack, we need to configure it accordingly.
- Preparation of the OpenStack project: We need a network, firewall rules, and a Talos Linux image from which we can boot.
- Setting up the Talos Linux VMs: For this article we will create a cluster consisting of one controlplane node and two worker nodes.
- Creating a Kubernetes cluster: After the successful installation of Talos Linux on OpenStack, we will look at how quickly and easily we can set up a Kubernetes cluster on it.
So let’s get straight to it!
Initialization of the Terraform project
For the installation of Terraform or OpenTofu please follow the links. After successful installation of the CLI, we create a new directory talos-openstack in which we will work. In this directory we create a new file main.tf with the following content:
terraform {
    required_providers {
        openstack = {
            source  = "terraform-provider-openstack/openstack"
            version = "~> 2.1.0"
        }
    }
}

provider "openstack" {
    auth_url    = "https://cloud.netways.de:5000/v3/"
    tenant_name = ""
    user_name   = ""
    password    = ""
    region      = "HetznerNBG4"
}With this information we tell Terraform that we need the official OpenStack provider for Terraform and how it should connect to our OpenStack project.
The above configuration is intended for NETWAYS Cloud, depending on the OpenStack used, the information must be adapted accordingly.
Using the following command, we can now initialize our Terraform project and download the OpenStack provider:
terraform initAfterwards we can start with the installation of Talos Linux on OpenStack!
Configuration of the OpenStack project
To set up a Kubernetes cluster on Talos Linux nodes, we need a few things in our OpenStack project, all of which we can provision with Terraform:
- a network + subnet: To better secure our cluster and the underlying VMs, it makes sense to use a dedicated network.
- a network router: To be able to manage our cluster and the Talos Linux VMs via the Internet, we need a router to connect our network to a so-called public network.
- a security group + rules: To define firewall rules, we need a so-called security group and corresponding rules.
- a Talos Linux boot image: To install our VMs, we need an image from which the VMs can initially boot Talos Linux.
Definition of network resources
To better organize our resources managed by Terraform, we will create a new file network.tf, in which we will define all network-related resources.
We will start with the network, subnet and network router:
resource "openstack_networking_network_v2" "talos" {
    name           = "talos-network"
    admin_state_up = true
}

resource "openstack_networking_subnet_v2" "talos-subnet-1" {
    name       = "talos-subnet-1"
    network_id = openstack_networking_network_v2.talos.id
    cidr       = "192.168.1.0/24"
}

resource "openstack_networking_router_v2" "talos-router" {
    name                = "talos-router"
    admin_state_up      = true
    external_network_id = data.openstack_networking_network_v2.public-network.id
}

resource "openstack_networking_router_interface_v2" "talos-router-interface" {
    router_id = openstack_networking_router_v2.talos-router.id
    subnet_id = openstack_networking_subnet_v2.talos-subnet-1.id
}We need one resource definition each for the network and subnet, whereby we assign a CIDR to the subnet and reference the defined network.
The router consists of two components: the router itself (the link between the router and the public network) and its interface (the link between the router and our subnet).
The attentive observer will have noticed that we reference the public network in the router definition via data.openstack_networking_network_v2.public-network.id – we must also define this so-called data variable.
To do this, we create another file data.tf, which initially contains a single entry:
data "openstack_networking_network_v2" "public-network" {
    name = "public-network"
}As with the configuration of Terraform itself, the definition here is also tailored to the NETWAYS Cloud – depending on the OpenStack environment, it is quite possible that any existing public networks may have a different name.
Definition of the firewall
Next, we can create the required security group and associated security rules . Before that, however, we should take a look at which network connections Talos Linux uses for communication within the cluster and via the CLI.
The official documentation helps us here:
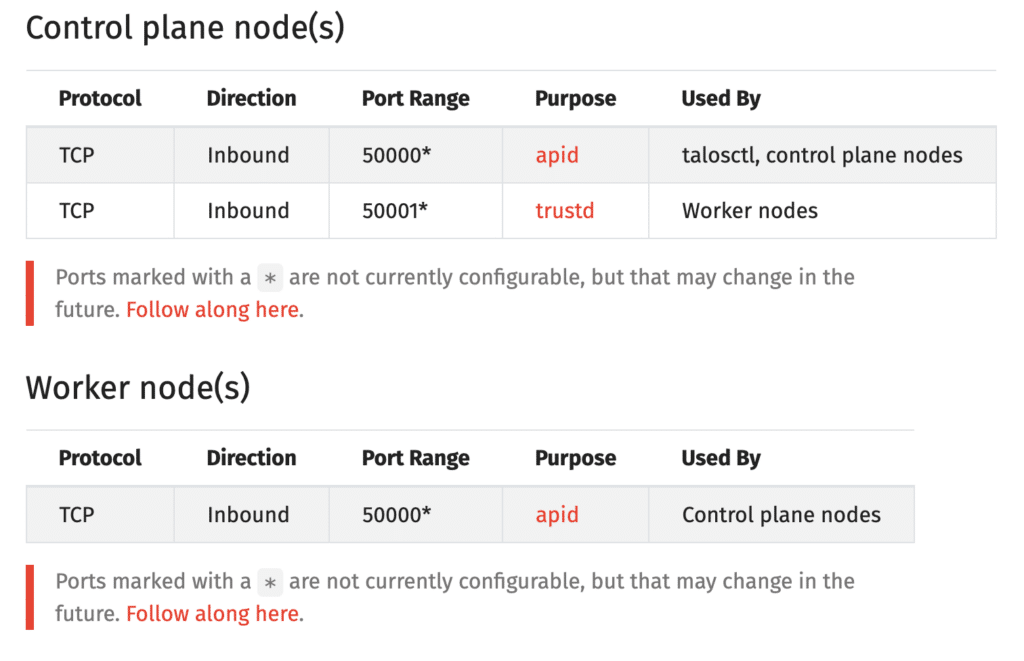
We therefore need security rules for ports 50000/50001 within the subnet and for port 50000 from remote (e.g. from our local Talos CLI).
We will also create a rule for port 6443 in order to be able to communicate with the Kubernetes API .
To this end, we are expanding network.tf to include the following resource definitions:
resource "openstack_networking_secgroup_v2" "talos-controlplane" {
    name        = "talos"
    description = "A Security Group for Talos Linux"
}

resource "openstack_networking_secgroup_v2" "talos-workers" {
    name        = "talos-workers"
    description = "A Security Group for Talos Linux workers"
}

resource "openstack_networking_secgroup_rule_v2" "k8s-api" {
    direction = "ingress"
    ethertype = "IPv4"
    protocol  = "tcp"
    port_range_min = 6443
    port_range_max = 6443
    remote_ip_prefix = "0.0.0.0/0"
    security_group_id = openstack_networking_secgroup_v2.talos-controlplane.id
}

resource "openstack_networking_secgroup_rule_v2" "talos-apid-controlplane" {
    direction = "ingress"
    ethertype = "IPv4"
    protocol  = "tcp"
    port_range_min = 50000
    port_range_max = 50000
    remote_ip_prefix = "0.0.0.0/0"
    security_group_id = openstack_networking_secgroup_v2.talos-controlplane.id
}

resource "openstack_networking_secgroup_rule_v2" "talos-trustd-controlplane" {
    direction = "ingress"
    ethertype = "IPv4"
    protocol = "tcp"
    port_range_min = 50001
    port_range_max = 50001
    remote_ip_prefix = openstack_networking_subnet_v2.talos-subnet-1.cidr
    security_group_id = openstack_networking_secgroup_v2.talos-controlplane.id
}

resource "openstack_networking_secgroup_rule_v2" "talos-apid-worker" {
    direction = "ingress"
    ethertype = "IPv4"
    protocol  = "tcp"
    port_range_min = 50000
    port_range_max = 50000
    remote_ip_prefix = openstack_networking_subnet_v2.talos-subnet-1.cidr
    security_group_id = openstack_networking_secgroup_v2.talos-workers.id
}In this way, we create two security groups and a handful of rules to map the connections to be released.
Definition of the Talos Linux boot image
The last ToDo of this first section is to define the Talos Linux boot image. We use the Talos Image Factory to create it and upload it easily.
As Talos Linux is immutable, required extensions cannot simply be installed later. The Talos Image Factory therefore makes it possible to create and download various preconfigured boot images.
For our OpenStack image, we can click through the dialog on the website as follows:
- Hardware Type: Cloud Server
- Choose Talos Linux Version: v1.7.5
- Cloud: OpenStack
- Machine Architecture: amd64
- System extensions: none
- Customization: none
We now land on a download page where we copy the link under First Boot > Disk Image .
We then insert it into a new file compute.tf as follows:
resource "openstack_images_image_v2" "talos-175" {
    name             = "Talos v1.7.5"
    image_source_url = "https://factory.talos.dev/image/376567988ad370138ad8b2698212367b8edcb69b5fd68c80be1f2ec7d603b4ba/v1.7.5/openstack-amd64.raw.xz"
    container_format = "bare"
    disk_format      = "raw"
    decompress       = "true"
}When Terraform is executed, the referenced image is first downloaded to our local computer, decompressed and then configured as a boot image in OpenStack.
We can now configure the Talos Linux VMs.
Setting up the Talos Linux VMs
The creation of VMs also requires the definition of several resources in Terraform:
- Ports: For connecting the VMs to the already defined subnet and for linking the security group(s)
- Floating IP: For availability of the control plane node via the Internet
- Compute Instances: the actual VMs, including resource and image definition.
Creation of network ports and floating IP
Before we finally define our Talos Linux VMs, the only thing missing is the network ports with which we connect the VMs to the defined subnet and the respective security groups . To do this, we add the following resources to compute.tf:
resource "openstack_networking_port_v2" "talos-controlplane" {
    depends_on         = [openstack_networking_subnet_v2.talos-subnet-1]
    name               = "talos-controlplane"
    network_id         = openstack_networking_network_v2.talos.id
    admin_state_up     = true
    security_group_ids = [openstack_networking_secgroup_v2.talos-controlplane.id]
}

resource "openstack_networking_port_v2" "talos-workers" {
    depends_on         = [openstack_networking_subnet_v2.talos-subnet-1]
    count              = 2
    name               = "talos-worker-${count.index}"
    network_id         = openstack_networking_network_v2.talos.id
    admin_state_up     = true
    security_group_ids = [openstack_networking_secgroup_v2.talos-workers.id]
}We now have two port definitions, one for the controlplane node to be created and one for the worker nodes, which will create two ports in OpenStack, one for each worker node, thanks to the count = 2 property.
We also define the floating IP in compute.tf and reference the port we have just defined for the control plane node and one of the public networks in our OpenStack environment:
resource "openstack_networking_floatingip_v2" "talos-controlplane" {
    pool    = "public-network"
    port_id = openstack_networking_port_v2.talos-controlplane.id
}As the specific floating IP is only known after the resources have been provisioned by Terraform, we have it output after successful creation. To do this, we create the file outputs.tf with the following content:
output "control-plane-ip" {
    value = openstack_networking_floatingip_v2.talos-controlplane.address
}Half-time: First provisioning with Terraform
At this point, we will now have Terraform provision the previously defined resources for the first time.
The reason for this is that we need to know the floating IP of our control plane node for the next steps.
We therefore execute the following command, confirm the X outstanding changes with yes, and wait for the successful completion of the provisioning:
terraform apply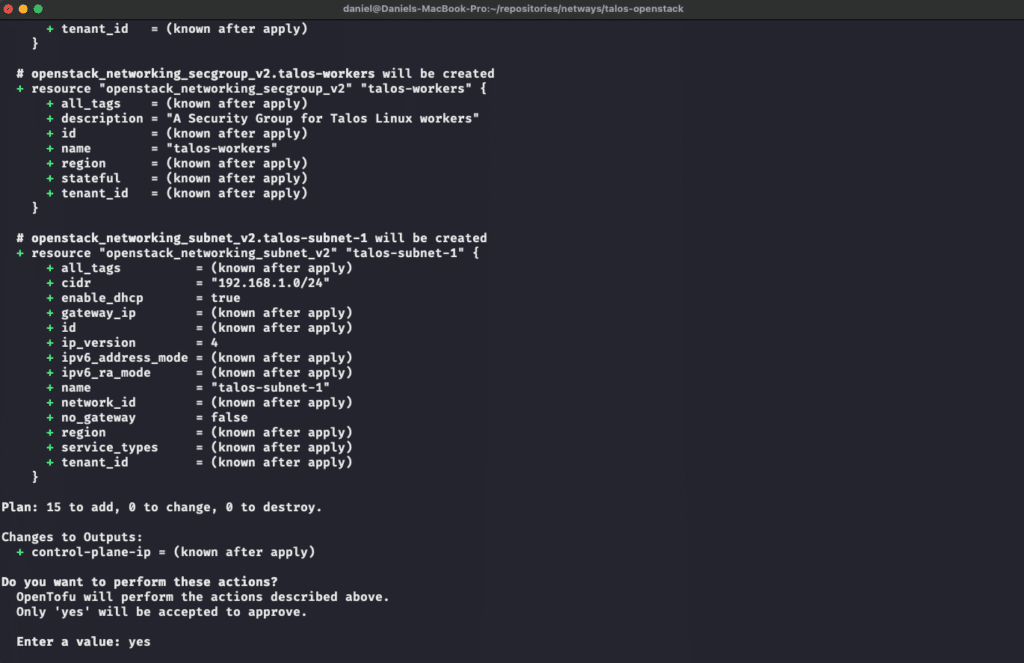
After successful provisioning, we also see our floating IP here for the first time – although it is not yet connected to any workload.

Creation of the Talos Linux VMs
After we have successfully provisioned (among other things) a floating IP for our project, we can proceed with the installation of Talos Linux on OpenStack.
Creation of the Talos configurations
If you have not already done so, now is the perfect time to install the Talos CLI. Please follow the link for instructions.
Once installed, we generate the required configuration files locally with the CLI.
First we generate the required secrets (CA keys, tokens, etc.).
Then we create the configuration for the control plane, worker and the local CLI: We pass a cluster name as well as the Kubernetes endpoint (https://:6443) and the previously created secrets – for this we need the previously created floating IP:
talosctl gen secrets
talosctl gen config talos-on-openstack https://:6443 --with-secrets secrets.yamlThis gives us four files:
secrets.confwith the secrets required for the configuration of Talos Linux and Kubernetestalosconfigwith the information required for our local CLIcontrolplane.yamlwith the configuration for our control plane node(s)worker.yamlwith the configuration for our worker nodes
Creation of the compute instances
To create the compute instances, we need a flavor in addition to the already defined boot image , which determines the number of CPUs, memory and hard disk space of the VMs, among other things.
For this purpose, we extend data.tf to obtain information about an existing flavor in our Terraform project. Due to the resource-saving design of Talos Linux, the flavor s1.small is sufficient for our purposes:
data "openstack_compute_flavor_v2" "s1-small" {
    name = "s1.small"
}Depending on the OpenStack environment, adjustments must be made here again to query an existing flavor.
With these resources defined, all that remains is to create the actual VMs! We also define these in compute.tf and reference our newly generated configuration files as user_data – this way, Talos takes them directly into account when creating the VMs:
resource "openstack_compute_instance_v2" "talos-controlplane" {
    name      = "talos-controlplane"
    image_id  = openstack_images_image_v2.talos-175.id
    flavor_id = data.openstack_compute_flavor_v2.s1-small.id
    user_data = file("controlplane.yaml")

    network {
        port = openstack_networking_port_v2.talos-controlplane.id
    }
}

resource "openstack_compute_instance_v2" "talos-workers" {
    count     = 2
    name      = "talos-worker-${count.index}"
    image_id  = openstack_images_image_v2.talos-175.id
    flavor_id = data.openstack_compute_flavor_v2.s1-small.id
    user_data = file("worker.yaml")
    network {
        port = openstack_networking_port_v2.talos-workers[count.index].id
    }
}As with the port definition, we also have two resources here, one for the control plane node and one for the worker nodes. We also reference the defined boot image, the flavor and the respective port.
The subnet-internal IP of the worker VMs may also be relevant for us, e.g. to make changes to the worker nodes via Talos CLI and our accessible control plane node.
We therefore also add a corresponding entry for the worker nodes in outputs.tf:
output "worker-ip" {
    value = openstack_compute_instance_v2.talos-workers[*].access_ip_v4
}Provisioning of Talos Linux VMs with Terraform
We are ready – all required resources are defined in *.tf files and we can move on to the (almost) final step: The actual provisioning of Talos Linux on OpenStack!
To do this, we use the following command again:
terraform applyTerraform will compare the state of our OpenStack project with the locally defined, desired state and then show us a summary of the outstanding changes (our three compute instances).

If we are satisfied with these changes, we confirm again with yes and wait until Terraform has carried out the provisioning. At the end, in addition to the already known floating IP, we should enter the two internal IPs of our worker nodes received as output:
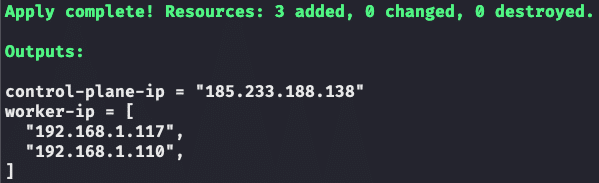
The installation of Talos Linux on OpenStack was successful! So let’s move on to the last step of our installation plan: Setting up a Kubernetes cluster.
Bootstrapping from Kubernetes to Talos Linux
The creation of a Kubernetes cluster on Talos is done with the following command against our controlplane node. We can save the resulting kubeconfig directly afterwards:
talosctl --talosconfig talosconfig bootstrap \
  --endpoints  \
  --nodes

talosctl --talosconfig talosconfig kubeconfig \
  --endpoints  \
--nodesNow we wait a moment until the cluster has been successfully created:
talosctl --talosconfig talosconfig health \
  --endpoints  \
--nodesOnce the cluster has been started, we can display its status. We just need to make sure that we are using the correct Kubernetes context :
kubectl get nodes
NAME                 STATUS   ROLES           AGE     VERSION
talos-controlplane   Ready    control-plane   2m16s   v1.30.3
talos-worker-0       Ready                    2m17s   v1.30.3
talos-worker-1 Ready 2m17s v1.30.3Talos Linux on OpenStack + Terraform = ❤️
With the successful installation of Talos Linux on OpenStack and the setup of your Kubernetes cluster, you now have a powerful and flexible environment that is specifically optimized for running container workloads.
The combination of OpenStack, Talos and Terraform gives you full control over your environment, which you can build “from scratch”, replicate or customize at any time. This approach gives you the freedom to design your Kubernetes clusters exactly according to your requirements, should managed services ever be too inflexible.
Either way, you are now ideally equipped to run your cloud-native applications on a stable, secure and scalable platform.
To stay on the ball, we would like to take this opportunity to recommend that you subscribe to our newsletter. This way you will regularly receive new, up-to-date and interesting insights into cloud-native practices, tutorials and news.


0 Comments