

Do you have a brand new Kubernetes cluster and want to get started? But regardless of whether you’re running a local minikube or a managed Kubernetes with all the bells and whistles, the first Kubernetes objects in the super simple YAML format will make almost everyone frown at first. What are deployments, services and the like? And why all the labels? Let’s try to shed some light on this.
The most important Kubernetes objects
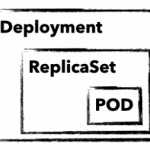
To manage and control a Kubernetes cluster, you use Kubernetes API objects in which you describe the desired state of the cluster. These are sent to the cluster in simple YAML format using kubectl. In addition to an API version, metadata and the object type, there is usually also the spec section, in which you describe the desired state of your application. spec can be defined differently for each object and is often nested. For example, an object deployment contains attributes for an object replicaSet, which in turn has attributes for a pod object in its own spec section. But before it gets too complicated, here is a brief explanation of these three important objects:
deployment
A deployment describes a desired state of an application and attempts to constantly create this state. Deployments can be used to start, scale, update, roll back and delete applications. Deployment objects are generally used to manage applications.
replicaSet
A replicaSet ensures the availability of a defined number of identical pods. If necessary, new pods are started and also stopped. replicaSet is normally only used indirectly through a deployment.
pod
A pod defines a group of containers (often just one) that share a common namespace on a host. The shared namespaces (e.g. shared file system or network) facilitate simple communication between the containers. A pod can always be reached via a unique IP in the cluster. Normally, pods are only used indirectly through a deployment.
With these three objects, we can start our first MariaDB deployment and establish an initial connection to it.
The first K8s deployment
As a first simple application, we start a non-replicated MariaDB as a deployment. But before we take a closer look at the definition, let’s send the object to your cluster using kubectl apply:
Simply save mariadb.yaml on your computer and send it to your cluster with apply:
kubectl apply -f mariadb.yaml deployment.apps/mariadb-deploy createdYou don’t have a kubectl yet?
Learn how to install and save kubectl
your kubeconfig in ~/.kube/config
To make changes to your deployment, you can simply adapt the yaml file and send it to your cluster with the same command. If you want to delete your deployment again, simply replace the apply with a delete.
mariadb.yaml
apiVersion: apps/v1
kind: Deployment
metadata:
  name: mariadb-deploy
  labels:
    app: mariadb
spec:
  replicas: 1
  selector:
    matchLabels:
      app: mariadb
  template:
    metadata:
      labels:
        app: mariadb
    spec:
      containers:
        - name: mariadb
          image: mariadb
          ports:
            - containerPort: 3306
              name: db-port
          env:
            - name: MYSQL_ROOT_PASSWORD
value: "123456"Explanation: If we take a closer look, we find parameters for all three Kubernetes objects in the example. Lines 1-6: We define API version, kind, name and a freely selectable label for our deployment object. Lines 8-11: Are part of the replicaset (RS). In addition to the number of replicas, matchLabels are also defined here and pods with the label mariadb are included in the RS. Lines 13-25: Define your pod. In addition to a label, parameters for the MariaDB container are passed. We use the official MariaDB image, define the port 3306 and set the root password for the database via an environment variable.
Better overview with describe and get
With describe and get you can get a quick overview and get all the necessary details of your applications. A simple kubectl describe deployment/mariadb-deploy provides all details about the MariaDB deployment from the example. get all, on the other hand, lists all objects, but the output can quickly become confusing even with just a few applications in the cluster. There are therefore various options for filtering the output, e.g. using the label app. With the following examples, however, you will quickly have the output under control.
Example for get with different filters
kubectl get pods
kubectl get deployment
kubectl get replicaset -l app=mariadb -o json
kubectl get po –field-selector=status.phase=RunningThe quickest way to display the components of your MariaDB is to use the Label Filter:
kubectl get all -l app=mariadbNAME READY STATUS RESTARTS AGE
pod/mariadb-deploy-64bfc599f7-j9twt 1/1 Running 0 64s
NAME READY UP-TO-DATE AVAILABLE AGE
deployment.apps/mariadb-deploy 1/1 1 1 64s
NAME DESIRED CURRENT READY AGE
replicaset.apps/mariadb-deploy-64bfc599f7 1 1 1 64sNow that you know how to check the current and desired state of your application, let’s take a closer look at pods and containers.
Interact with pods
Without further configuration, applications are only accessible within the Kubernetes cluster. In addition, you rarely want to make a database accessible via a public IP. kubectl therefore offers two options, proxy and port-forward , to ensure access to internal pods and services. For MariaDB we use port-forward and send all traffic that arrives locally on port 3306 through kubectl to our MariaDB pod. By the way, you can use the name of the deployment directly. However, the names of pod and replicaSet lead to the same result. Using telnet or a MySQL client is the quickest way to check whether the connection is working:
kubectl port-forward deployment.apps/mariadb-deploy 3306:3306

mysql -h 127.0.0.1 -P 3306 -u root -p123456

telnet 127.0.0.1 3306
kubectl offers further options for interacting with its container with log and exec. The former, of course, shows you stdout of your pod. exec , on the other hand, is probably mostly used to start an interactive shell. Similar to docker, you need the parameters interactive and tty (-ti) to get a functional bash:
kubectl exec -it mariadb-deploy-64bfc599f7-j9twt — /bin/bashWith these few commands, you can reach and debug your pods shielded in the K8s cluster. Of course, applications that are only accessible within the cluster do not always make sense. So that others can also access them, you need a Kubernetes service with a public IP. But there is much more behind a service.
Connect your pods to a service
A service binds a fixed internal IP address (ClusterIP) to a set of pods, which are identified by labels. Compared to a service, pods are very short-lived. As soon as we trigger an upgrade of MariaDB in the example, our deployment discards the existing pod and starts a new one. As each pod has its own IP address, the IP address at which your MariaDB can be reached also changes. Thanks to the labels, the service finds the new pod and the traffic is forwarded correctly. A service thus ensures the internal accessibility of your deployments through the ClusterIP. In addition, aservice can also have the type load balancer. This binds a public IP and forwards all traffic to the ClusterIP. In the following example you can see a service for your MariaDB.
In addition to API version, kind and metadata, there is again the spec section. Protocol, port and targetPort define which traffic is forwarded. In the selector, the labels are used to determine which pods are to be served. With the optional line type: LoadBalancer, a public IP is bound in addition to an internal cluster IP.
apiVersion: v1
kind: Service
metadata:
  name: mariadb-service
spec:
  ports:
  - port: 3306
    targetPort: 3306
    protocol: TCP
    name: mariadb
  selector:
    app: mariadb
type: LoadBalancerIn the example, exactly one container is defined for one pod and our selector in the server only applies to one pod. But what happens when replicas are increased in the deployment? First, of course, several pods are started and therefore also several MariaDB containers. The selector in the MariaDB service naturally finds these using the label and the connections are forwarded to the pods using the round-robin method. Technically, this works without any problems in the example, but as long as MariaDB itself is not installed as a replicating cluster, this makes little sense.
What comes next?
You can use the examples shown here to roll out and debug your first applications. But you can already guess that we’ve only scratched the surface of Kubernetes and there are still many questions to be answered! What happens to my data in MariaDB and how can I connect the ephemeral pods to a persistent volume? Do I need a separate public IP for each application? How do I get metrics and logs of my cluster and my applications? These and other questions will of course be answered in the following tutorials.


0 Comments