

In today’s world of the cloud, it’s easy to lose track: VMs, Kubernetes, Serverless, the possibilities are almost endless, and the “best” way to run applications is not always clear. It is often worth creating a proof of concept and going through a cloud deployment yourself.
This is exactly what we will do in this tutorial: Using Terraform and Docker, we will set up a server in the NETWAYS Cloud and deploy our demo application on it. The result: reproducible, secure infrastructure and an application secured via TLS that runs on it inside a container. The entire cloud deployment should take no longer than 15 minutes – provided you have the necessary tools at hand.
You can follow along in parallel or look at the code again if you need to.
Prerequisites
For the cloud deployment, we first need to fulfill a few prerequisites. You will need the following things to follow the tutorial:
- a MyNWS account with a configured NETWAYS Cloud project
- Terraform, installed on your computer
- an SSH key to access your server
- the Git repository with the required Terraform resources and the demo application
- [Optional] A domain for TLS-encrypted access
Activation of the OpenStack Project User
Make sure that the OpenStack Project User is activated in your NETWAYS Cloud project, as you will use it for provisioning the server with Terraform. We have described how you can activate it and view the password in our documentation.
If the project user is already activated, you can make a note of the following information – you will need them in the next step to configure Terraform:
- Project name – the name of your NETWAYS Cloud project, or the name of the activated project user.
- Password – the password of the activated project user
Downloading the Git repository
The last requirement to follow the tutorial is the repository available on GitHub with all the resources needed for our cloud deployment. You can clone it with git and download it to your computer:
git clone https://github.com/netways-web-services/15-minutes-cloud-deployment
cd 15-minutes-cloud-deploymentNow we should have everything we need to start the actual tutorial.
Step 1: Provisioning the Infrastructure
Before we can deploy our demo application, we first need the infrastructure on which it will run. This consists of the following components, which we provision with the help of Terraform:
- a cloud server with Ubuntu Noble 24.04 LTS and s1.small flavor (2 CPUs, 2GB RAM, 25GB disk)
- a security group to allow access via HTTP/S (ports 80 and 443) and SSH (port 22)
- a network port with floating IP to assign the security group to the cloud server and to be able to reach the server via the Internet
Before we can provision the corresponding resources with Terraform, however, we must first configure Terraform itself. For this purpose, we have prepared a file vars.auto.tfvars.example, which you must rename and fill out:
mv vars.auto.tfvars.example vars.auto.tfvarsThe following values need to be entered:
- ssh_pub_key: The public key of the SSH key pair that you want to use for the connection to the server.
- project_name: The project name you wrote down in the previous step.
- password: The password you wrote down in the previous step.
Once the values have been entered, the Terraform project still needs to be initialized. This is done with the following command:
terraform initIf everything is configured correctly, Terraform confirms that the initialization was successful and we can start provisioning.
Planning the Cloud Deployment Infrastructure
Terraform allows us to plan the resources to be provisioned before execution and to view the calculated result. In this way, we can validate that all the required resources are actually defined correctly and would be created in a provisioning run:
terraform planThe output from Terraform corresponds to a long list of actions to be executed. Since no infrastructure provisioned by Terraform exists in our project so far, all listed actions should be of type create.
A quick way to check the correctness of the plan can be found at the end of the output. If you see following message here, your project is set up correctly and you can continue provisioning your cloud deployment infrastructure.
Plan: 9 to add, 0 to change, 0 to destroy.Provisioning of the Cloud Deployment Infrastructure
Provisioning the required cloud resources with the help of Terraform works very similarly to displaying the plan in the previous step:
terraform applyTerraform again lists all the actions to be performed and asks you whether it should continue. Answer the question with yes and confirm by pressing Enter. Terraform now begins to execute the listed actions. In doing so, it ensures that interdependent resources (e.g. ports and floating IPs) are created in the correct order.
After 1-2 minutes Terraform should deliver the following output and successfully complete the provisioning:
Apply complete! Resources: 9 added, 0 changed, 0 destroyed.
Outputs:
floating_ip = "91.198.2.136"
instance_id = "f6a849c9-1604-4177-93a8-a058336fa223"
private_ip = "172.16.0.78"Information about our server is listed under outputs. The specific values are of course different for your resources in the NETWAYS Cloud. The floating_ip field is important for us, as it tells us which IP we can use to reach our server for the next steps of our cloud deployment.
Step 2: Installing Docker
Next, we need to install Docker on our server in the NETWAYS Cloud in order to continue with our cloud deployment. As we have set up our server with Ubuntu Noble 24.04 LTS, we can use the installation instructions for Docker on Ubuntu as a guide.
First we connect to our server via SSH – here we enter the SSH key used for provisioning with Terraform and connect to the floating_ip issued by Terraform:
ssh -i <ssh-key> ubuntu@<floating_ip>We can then install Docker with the following commands:
# Add Docker's official GPG key:
sudo apt update
sudo apt install ca-certificates curl
sudo install -m 0755 -d /etc/apt/keyrings
sudo curl -fsSL https://download.docker.com/linux/ubuntu/gpg -o /etc/apt/keyrings/docker.asc
sudo chmod a+r /etc/apt/keyrings/docker.asc
# Add the repository to Apt sources:
sudo tee /etc/apt/sources.list.d/docker.sources <<EOF
Types: deb
URIs: https://download.docker.com/linux/ubuntu
Suites: $(. /etc/os-release && echo "${UBUNTU_CODENAME:-$VERSION_CODENAME}")
Components: stable
Signed-By: /etc/apt/keyrings/docker.asc
EOF
sudo apt update
sudo apt install -y docker-ce docker-ce-cli containerd.io docker-buildx-plugin docker-compose-pluginWe can test the successful installation of Docker with the hello-world image:
sudo docker run --rm hello-worldThe output should look like this:
Hello from Docker!
This message shows that your installation appears to be working correctly.
To generate this message, Docker took the following steps:
1. The Docker client contacted the Docker daemon.
2. The Docker daemon pulled the "hello-world" image from the Docker Hub.
(amd64)
3. The Docker daemon created a new container from that image which runs the
executable that produces the output you are currently reading.
4. The Docker daemon streamed that output to the Docker client, which sent it
to your terminal.
To try something more ambitious, you can run an Ubuntu container with:
$ docker run -it ubuntu bash
Share images, automate workflows, and more with a free Docker ID:
https://hub.docker.com/
For more examples and ideas, visit:
https://docs.docker.com/get-started/Step 3: Deployment of the Demo Application
At this point, we have created all the prerequisites for a successful cloud deployment of our demo application: We have provisioned a server in the NETWAYS Cloud, restricted access via the network to the minimum using a security group, and installed and tested Docker for deploying the application. As a (pre-)final step, we are now deploying the demo application ourselves.
To do this, we first clone the demo repository from GitHub on our server in the NETWAYS Cloud and switch to the app/ directory:
cd ~
git clone https://github.com/netways-web-services/15-minutes-cloud-deployment
cd 15-minutes-cloud-deployment/appIn diesem Verzeichnis befindet sich der Code der Demo-Anwendung sowie eine compose.yml Datei, mit der wir die Anwendung deployen können – zuvor müssen wir allerdings ein Docker-Image bauen. Die Definition dafür befindet sich im Dockerfile im gleichen Verzeichnis.
sudo docker compose buildAfter a few seconds, the construction of the Docker image should be successfully completed and we can start our demo application for the first time:
sudo docker compose upDocker generates some output during the creation of the compose stack and then displays the logs of the container that has just been started. Since we have specified that the container port 5000 should be mapped to the host port 80 in our compose.yml, our demo application should now be available under the floating IP of our server via a web browser. Let’s try it out!
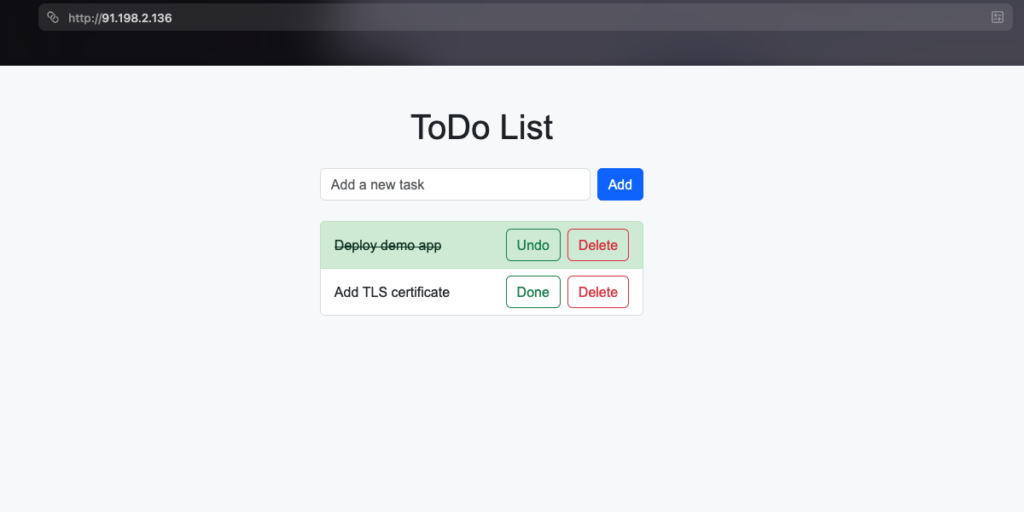
Indeed – the demo application is available and works as expected. Our cloud deployment was successful. However, it is not yet optimal – for example, a valid TLS certificate is still missing in order to access our demo application via HTTPS.
Step 4: HTTPS Configuration of the Demo Application
You need a domain for which you can store an A record with the floating IP of the provisioned server.
For the automatic creation of a valid TLS certificate and the regular renewal of the certificate, we use Traefik, an open source proxy for applications, especially popular in the Docker and Kubernetes context.
We deploy Traefik as part of our compose stack by adapting our file compose.yml as follows – the lines to be changed are highlighted in color:
services:
  todo-app:
    build:
      context: ./
    ports:
      - "5000"
    restart: unless-stopped
    networks:
      - traefik
    labels:
      - "traefik.enable=true"
      - "traefik.http.routers.todo-app.rule=Host(`<YOUR_DOMAIN>`)"
      - "traefik.http.routers.todo-app.entrypoints=websecure"
      - "traefik.http.routers.todo-app.tls=true"
      - "traefik.http.routers.todo-app.tls.certresolver=le"

  traefik:
    image: traefik:latest
    ports:
      - "80:80"
      - "443:443"
    volumes:
      - /var/run/docker.sock:/var/run/docker.sock:ro
      - ./acme:/acme
    command:
      # general confiuration
      - "--providers.docker=true"
      - "--api.dashboard=false"

      # entrypoint configuration
      - "--entryPoints.web.address=:80"
      - "--entryPoints.websecure.address=:443"
      - "--entryPoints.websecure.http.tls=true"

      # LetsEncrypt configuration
      - "--certificatesresolvers.le.acme.email=<YOUR_EMAIL>"
      - "--certificatesresolvers.le.acme.storage=/acme/acme.json"
      - "--certificatesresolvers.le.acme.httpchallenge.entryPoint=web"
    networks:
      - traefik
    restart: unless-stopped

networks:
  traefik:
Configuration of Traefik
At first glance, this looks like a lot of changes. However, these can be summarized quite briefly:
The changes to our already configured demo application result in the following behavior:
- The container port of the demo application is no longer mapped to the host port – Traefik now takes care of the routing.
- The demo application is deployed in a Docker network called traefik to enable routing.
- The criteria for routing are defined by labels:
- The host (i.e. the URL in our browser) must correspond to the value we set instead of YOUR_DOMAIN .
For this domain, you must store an A record for the floating IP of the server that we provisioned with Terraform in step 1. - The connection must take place via HTTPS.
- The certificate required for the HTTPS connection is provided by a resolver le.
- The host (i.e. the URL in our browser) must correspond to the value we set instead of YOUR_DOMAIN .
The new block for traefik also includes some options:
- Traefik’s container ports are mapped to the host ports 80/443 (HTTP/S)
- We mount two files/directories:
- the Docker socket to be able to read the routing configuration of our demo application.
- a directory
acme/, in which the Let’s Encrypt configuration is saved.
- We define the rest of the required configuration in the Traefik service command :
- We activate the Docker provider and deactivate Traefik’s dashboard
- We define two entry points:
- Entrypoint web on port 80 (HTTP)
- Entrypoint websecure on port 443 (HTTPS)
- TLS certificates are provided by a resolver called le, which accepts HTTPChallenges from Let’s Encrypt via the web entrypoint.
Please make sure to enter your own valid values for YOUR_DOMAIN and YOUR_EMAIL. Otherwise the cloud deployment will fail or the demo application will not be accessible.
Once all the changes have been made, we can roll out our cloud deployment again. Docker Compose does this automatically for containers with a changed configuration:
sudo docker compose up -dThe moment of truth has arrived – if we have done everything correctly, our demo application should now be available at https://<YOUR_DOMAIN> – in my case that would be https://todo-app.nws.netways.de.
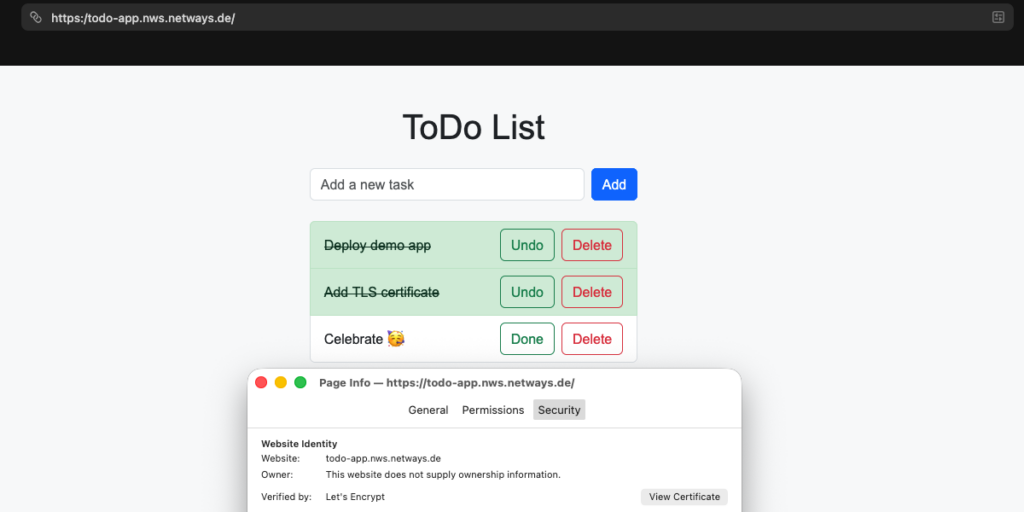
Our TLS-encrypted cloud deployment was successful. The browser confirms that a valid TLS certificate issued by Let’s Encrypt is available. Our valuable ToDos are now accessible via an encrypted connection.
Next Steps for Your Cloud Deployment
As far as this tutorial is concerned, we have now reached the end. However, the environment we have provisioned does not have to be discarded immediately: You can expand the resources created for Terraform and Docker as you wish, adapt them to your configuration or use them as a template for another cloud deployment. Traefik also offers many other useful features that you can explore and use in your cloud infrastructure.
Tidying Up the Cloud Deployment Infrastructure
If you want to save costs and clean up the tutorial environment, you can also do this via Terraform:
terraform destroyAs with terraform apply, Terraform requires a confirmation for this process, which you can provide by entering yes. Terraform then deletes the provisioned resources in the NETWAYS Cloud and confirms the successful deprovisioning.
If you have entered a DNS entry for the floating IP of the demo application, you should also delete this.
Further Resources
If this tutorial has got you hooked on the cloud, Terraform and Docker, you can find out more on the following pages:
- Docker Compose documentation: Learn how to deploy applications consisting of multiple services with just one YAML file.
- Terraform OpenStack Provider DocumentationLearn which other resources you can provision in the NETWAYS Cloud.
- Traefik Proxy DocumentationLearn more about Traefik, the cloud-native application proxy.
- Let’s Encrypt Website: Visit the Let’s Encrypt website to learn more about their free service for TLS certificates.
- NETWAYS Cloud Documentation: You can find out more about the NETWAYS Cloud and our other services in our own documentation.


0 Comments